| Last updated 8 November 2018
Contents: |
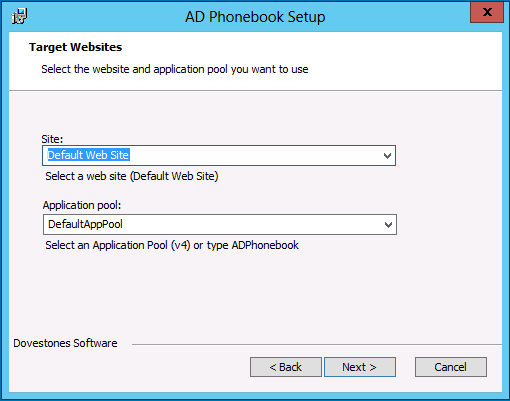
IntroductionAD Phonebook is a browser-based program that is installed on a Windows Server running IIS. The AD Phonebook reads user data you already have stored in Active Directory and displays it to your organisation in a readable accessible form. Active Directory is normally an organisation company wide user database, the data you have stored here can be used to create the perfect employee directory. There are many uses for the AD Phonebook and we have seen it used in many creative ways. If you have users or contacts stored in Active Directory that you would like to present to your users or even a third party then AD Phonebook can help. AD Self UpdateAD Self Update is a separate program that allows your users to update their own Active Directory contact information, we mention it here as it is the perfect companion to AD Phonebook. Empowering employees or HR to update AD user data ensures your phonebook is as up to date as possible. To read more about AD Self Update click here. on, the text here is what your users will see when they visit the phonebook and no users are loaded.he managers name (E.g. John Smith) which is easier to read. Regular expressions can be applied to any column/attribute by clicking the ‘Edit’ button for that column on the ‘List Columns’ tab. Technical SupportThis document will walk you through AD Phonebook installation and configuration. Should you have any further questions please contact us at [email protected]. PrerequisitesThe following software should be installed before installing the application: InstallationFollow the steps below to install AD Phonebook on a Windows Server that has the prerequisites above installed:
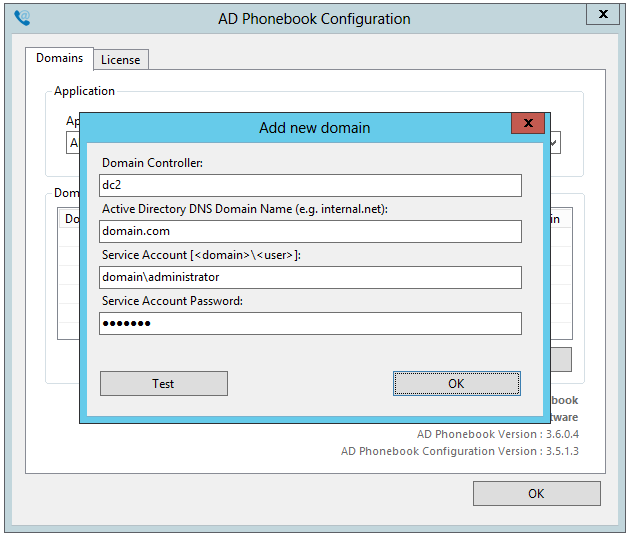
Connecting to Active DirectoryFollow these steps to configure the Active Directory domain(s) that the application will use. 1. From the Start menu open the AD Phonebook Configuration program Note: You must supply user credentials that has sufficient permissions to read user and contact objects.
4. Repeat steps 3 and 4 to add additional domains (this is optional, multiple domains are supported). Connecting to Azure Active DirectoryFor Azure AD specify a user for the connection and a Client ID. To obtain a client ID follow the steps on the following page:
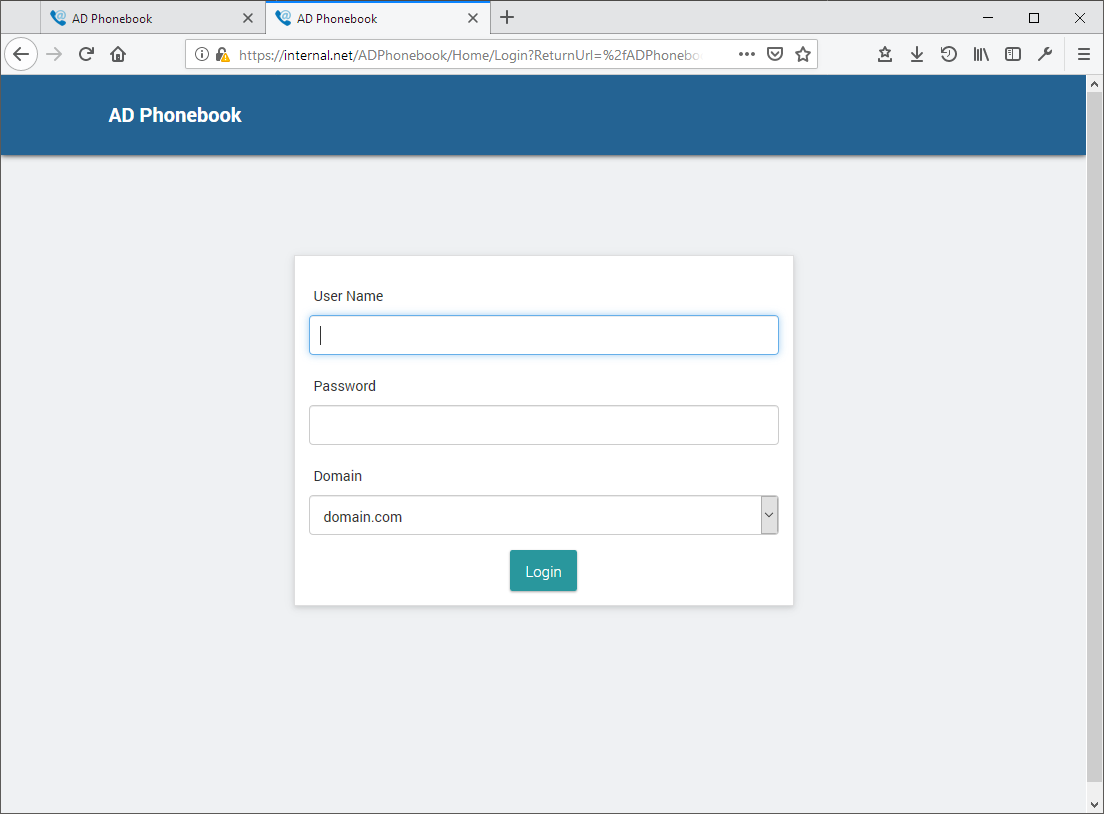
Accessing the AD Phonebook web pageWhen you have added your service account using the AD Configuration tool you can visit the AD Phonebook web page, the address depends on the web site where you have chosen during the installation (step 2), if this was the default web site then the URL http://localhost/ADPhonebook should work. Example URLS: Note: The first load of the phonebook will take a little longer than normal. Accessing the Admin pageThe Admin page allows you to customize the phonebook and define which users will be shown. The Admin page can be accessed by adding /Admin to the phonebook URL, by default, users that are members of the Domain Admins, Built-In\Administrators (in AD not local) can access the admin page. Alternatively, you can create a group named ADPhonebookAdmins anywhere in AD and members of this group are granted access. Regular domain users will be unable to access the admin page. Example:
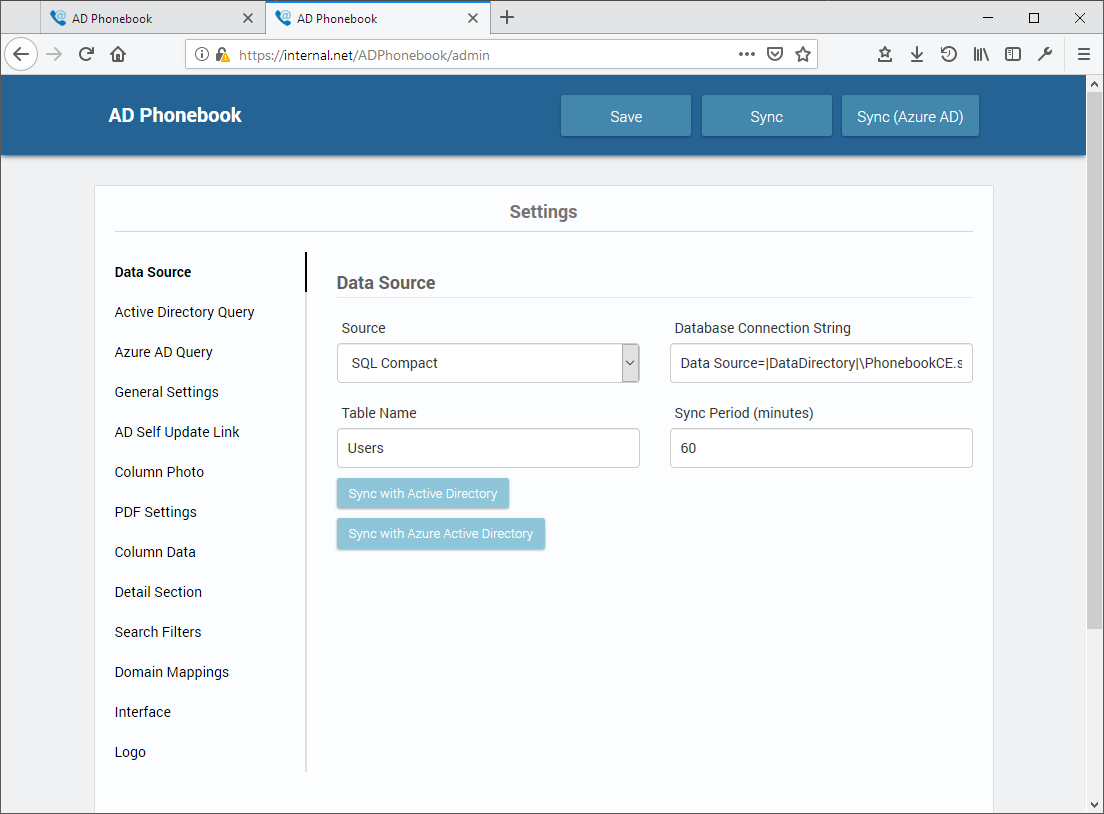
Saving ChangesWhen you have made changes on the Admin page click the save button in the header to save the change, changes are written to the ‘Settings.config’ file which can be found in the App_Data folder (default location is C:\inetpub\wwwroot\ADPhonebook\App_Data\). Backing up this file can save you time should you need to restore your configuration later. Data SourceBelow is a screen shot of the Admin page showing the Data Source section. Here you can specify a data source and how frequently the program will synchronize with Active Directory, the default is 60 minutes. The default data source is SQL Compact. An external Microsoft SQL Server is also supported. Note: Click the button ‘Sync DB Now’ to start the synchronization with Active Directory.
Listing Users and ContactsThe Active Directory Query section of the Admin page controls which users/contacts are shown in the phonebook. The LDAP Filter will show users and contacts but hide disabled users, the filter can be changed, you will find many examples on the web of modifying Active Directory LDAP filters. By default, the program will display all users in Active Directory that have a value in the telephone number (telephoneNumber attribute) and an email address (mail attribute), other users will be excluded. Below we’ll explain how to include and exclude users. OUs to QueryUnder the section named OUs to Query you can add Organization Units which the program will read, users/contacts outside of these OUs will be excluded. Click the Insert button to add an OU, in the example below, users in the New York, Staff and Students OUs would appear in the phonebook, users outside of these OUs would not be shown. Users in these OUs could still be excluded if the meet the criteria of another exclusion setting such as are they a member of an excluded groups or are they missing a telephone number or email address.
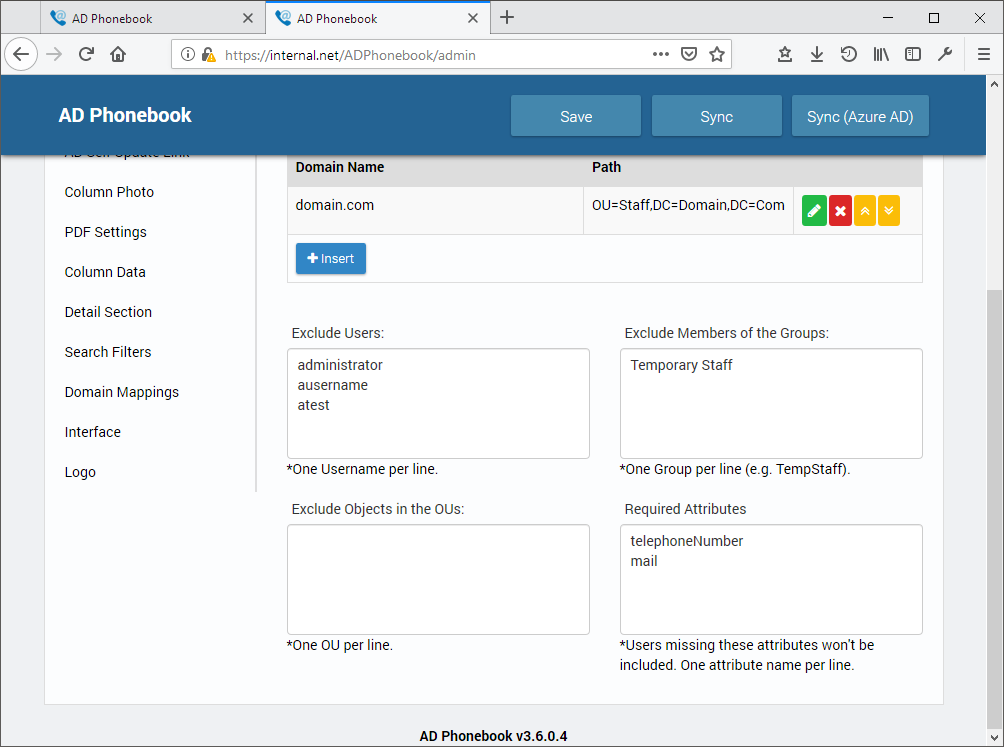
Hiding Users, Groups and OUsShould you want to hide certain users or groups add them to the Exclude Users/Group/OUs section, see the example below.
Azure AD QueryThe Azure AD Query tab allows you to exclude users and groups that exist in Azure AD that you do now want shown in the phonebook. General SettingsFrom the General Settings tab you can change labels, export options, search options etc. We’ll cover each setting below. Page Title and Logo TextThe Phonebook title will appear on the logon page and browser tab. Page SizeThe Page Size value controls how many users/rows are shown per page. Default DomainIf you have more than one domain specified using the AD Phonebook Config program and you would like this to be shown first in the Domains drop down filter specify it here. Domain Drop Down MenuIf you have multiple domains and you want users to be able to switch between domains (e.g. Staff and Students) and perform searches against a specific domain set ‘Domains Drop-Down List’ to Visible. Export OptionsYou can give your users the option of export the phonebook to a file. The export formats are PDF, XLS (Excel), RTF (opens in Word or similar) and CSV (Comma Separated Value). Button LabelsThe labels users see in the header such as ‘Search’ and ‘Sort By’ can be changed on the General Settings tab. You can change the language here or change it to a word or phrase you prefer. Show Searched Users OnlyBy default, when the phonebook loads you will see some users, if you would rather no users be shown and only display users when searched for then enable this option. Empty Grid TextRelated to the ‘Show Searched Users Only’ option, the text here is what your users will see when they visit the phonebook and no users are loaded. Use Local PhotosBy default the program will load users photos from Active Directory by reading the thumbnailPhoto attribute (by default, you can change this to jpegPhoto if needed). Alternatively you can load photos from a local folder. Enable this option and specify the location of the files in ‘Local Photo Path Format’, the file names should be %username%.jpg. Footer Text (HTML)You can add text to display in the footer of the phonebook. You can use HTML here. Display HTML HeaderrAt the top of the phonebook beneath the header is a section of text where you can add instructions or links to other users or external pages. The HTML Header can be disabled if you would rather it not be there. Display Department FilterIn the header is a filter named Department, the program reads the values found in the ‘department’ attribute and lists them here, this allows user to quickly locate users in the chosen department. You can remove this filter by setting this option to Disabled. Display Location FilterLike the option above, the Location filter allows users to filter users by office location, country or domain. You can specify which attribute is used for the filter under ‘Location Column’. Use Local Fonts and jQueryBy default, the program will load fonts and jquery (JavaScript library) from Google, if your computers do not have internet access or you would rather fonts and jQuery is loaded locally choose this option. AD Self Update LinkFrom this tab you can enable or disable the Update tab which is shown in the ‘Details Section’. This is useful i you are using AD Self Update; your users can then update their own information using AD Self Update should they see information that is incorrect. This is disabled by default. Column PhotoBy default a user’s photo is shown in the main grid, if you would prefer not to see the users photo you can disable this here. The photos are read from the thumbnailPhoto attribute in Active Directory, you can change this if needed. You can also change the size of the image that is shown in the phonebook, the default size is 100px x 100px, the photo is rendered round and scaled using css. PDF Export SettingsThere are a several options you can use when exporting to PDF. You can set the orientation of the page, landscape maybe better if you have more than five columns shown. The option ‘Auto-Fit Width’ will expand the columns to fill the page width. You add text you would like shown in the header and footer of the PDF to the header and footer sections. You can adjust the font size and change the margin size. Column DataColumn Data contains the column your users will see in the phonebook, by default the phonebook will display the columns listed below. In the Column Settings section you can add, remove or edit columns. You hide columns, specify which column the users will be sorted by, create hyperlinks and use regular expressions to format the values shown. Clicking on the ‘New Column’ button will open the Edit column window, here you can add additional columns that will be shown in the main grid. Clicking on the edit button will allow you to edit existing columns. Column Header Text and LDAP PropertyBelow is an example column, the Header Text can have any name you like but the LDAP Property must exactly match the Active Directory property name. For example you could have the ‘Header Text’ value read ‘Car Parking Space’ and the ‘LDAP Property’ could be ‘extensionAttribute1’. VisibilityIf you want to hide a column from view you can change the visibilty to Hide, alternatively remove the column. Hide can be helpful if you think you may use the column again in the future. HyperlinksIf you would like the column value to be a hyperlink check the Hyperlink check box and enter a protocol or scheme name e.g. mailto:{0} or tel:{0} . You can also use the URI text box to pass arguments in the URL for example the default manager column contains the URI value ../ADPhonebook/?name={0} this is used to display the managers details when the managers name is clicked. Regular ExpressionsYou can use regular expressions (abbreviated as Regex Pattern) to manipulate the displayed values. Certain attributes such as ‘manager’ contain the full LDAP path to the mangers user object (E.g. CN=John Smith,OU=Managers,DC=Domain,DC=Com), Regular Expressions can be used to remove the path and leave just the managers name (E.g. John Smith) which is easier to read. Regular expressions can be applied to any column/attribute by clicking the ‘Edit’ button for that column on the ‘List Columns’ tab. Hide On MobileWhen the phonebook is viewed on a mobile device you’ll want to hide some columns to make it easy to read due to the limited width on mobile devices. Use the hide on mobile check box to hide columns you don’t want to show on mobiles, some of the default columns already have this checked. You can still see hidden values by adding them to the users details (clicking/touching the users name). Sort by this ColumnBy default the main grid is sorted using the cn attribute (Name column), you can change this to another column by checking Sort by this column, ensure this is checked for one column only. Include in PDFIf PDF export is enabled under ‘General Settings’ then your users can export a copy of the phonebook to PDF. Due to the constraints of the paper size and fonts sizes all the columns you see on screen may not fit in the exported PDF. To choose which columns are used in the PDF export, check or uncheck the ‘Include in PDF’ option. Truncate long valuesYou may find certain columns/attributes such as title or department contain long values, one users long job title may make the column unnecessarily wide meaning there isn’t room on the screen for other columns or other columns become squashed or the value overlaps to the line below. By checking Truncate long values the width of the column will be fixed and any long values will be truncated and … will appear after the displayed value to indicate the value is longer. The user can click the > to see more data on the contact and read the full value. Width and Mobile WidthYou can force one column to be a certain width and the others will adjust i.e. those with no value will expand or contract but the ones you define a fixed width will keep that width. Truncated or overlapping telephone numbers aren’t much use so you may want to fix the width of columns containing a phone number. Details SectionWhen you click or touch a user’s name or the > symbol additional information (details) about the user are displayed. You can customize the tabs and the content shown on these tabs via the Details Section. Above shows the ‘Details Section’ as your users see it after the > is clicked. Detail DataYou can add and remove fields from the details section like you can with the Column Data. On the Details Section tab you will see ‘Detail Data’, the values shown in the grid relate to the tabs your users will see. Tabs can be added, edited or removed. Clicking on the ‘New Section’ button will open a new window, here you can add additional tab(s) that show next to the existing tabs. Clicking on the New Row button will allow you to add new row/attribute. You can change the order the tabs appear by using the arrows. Search FiltersIn the header next to the search box is a drop down menu of fields a user can search within. If non are selected all fields are searched. To add or remove items from this list use the Search Filters tab. The search is performed against the database, for the search filters to work the filters added need to also appear in the Columns Data section and a Sync needs to have taken place. Domain MappingsIf you have more than one domain and you have the domain drop down box shown you can assign a friendly name to each domain. Interface and LogoYou can customize the colours used in the phonebook via the Interface tab, the colour values is a hexadecimal colour value. Click the Restore button to restore the original default colours. Using HTTPS and SSL CertificatesWhilst the phonebook will work perfectly using HTTP its best practice when a web site contains sensitive data to install an SSL certificate and access the site using HTTPS. A SSL certificate can be added to the web site (normally Default Web Site) via IIS. There are many documents and videos on the web showing how to add a SSL certificate and enable HTTPS in IIS (Internet Information Server). Querying the phonebook via a URLThe AD Phonebook can take queries passed via the URL, you can query any of the columns that are being displayed in the phonebook. The url should be followed by a question mark then the column name and the value you want to search for. You can combine two or more using &. Example: http://server/adphonebook?columnName=value A few more examples: http://server/adphonebook?department=sales Querying the phonebook from other web pagesThe AD Phonebook can take queries passed from another web page such as an intranet page. Below is an example html form that will query the phonebook. Form elements can be added or removed. Example: Simple example Help and SupportIf you require any help installing or configuring AD Phonebook contact us. |
|---|
Footer
Dovestones Software
Copyright 2005 – 2023 © Infoopia Inc.
All rights reserved.
Registered office:
Infoopia Inc.
PO Box 93383
Newmarket Ontario
L3X 1A3
Canada
Phone (voice mail):
Toll-Free 1.877.335.8909
Outside of US/Canada +1.647.478.8078
Our Newsletter
Subscribe to our newsletter to receive the latest updates.
You can review our privacy policy here.

