| Last updated 9 November 2018Contents: Introduction Installation Basic Configuration Using HTTPS General Settings Reset by Questions Reset by SMS Reset by Email Access Control Change Password Admin Page Helpdesk Feature Expiry Notifications Password Policies Custom Look User Enrolment Password Reset Changing Password Help |
IntroductionUsers forgetting their passwords is a common headache for IT departments. AD Self Password Reset allows your users to safely reset their own password without calling the IT helpdesk. InstallationTo install the program, follow the steps below.
RemovalTo remove the program, follow the steps below.
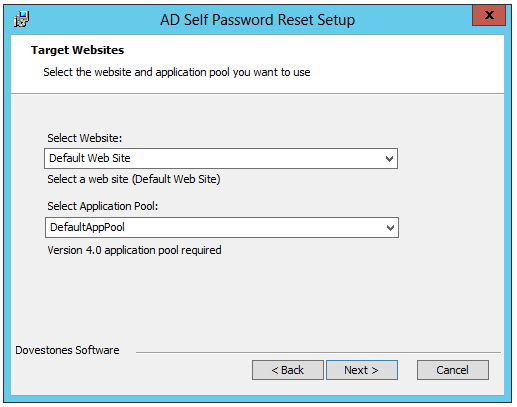
Basic ConfigurationBefore the application can be used there are three items that need configuration, these are found on the ‘Connection’ tab in the Configuration program. To do this follow the steps below.
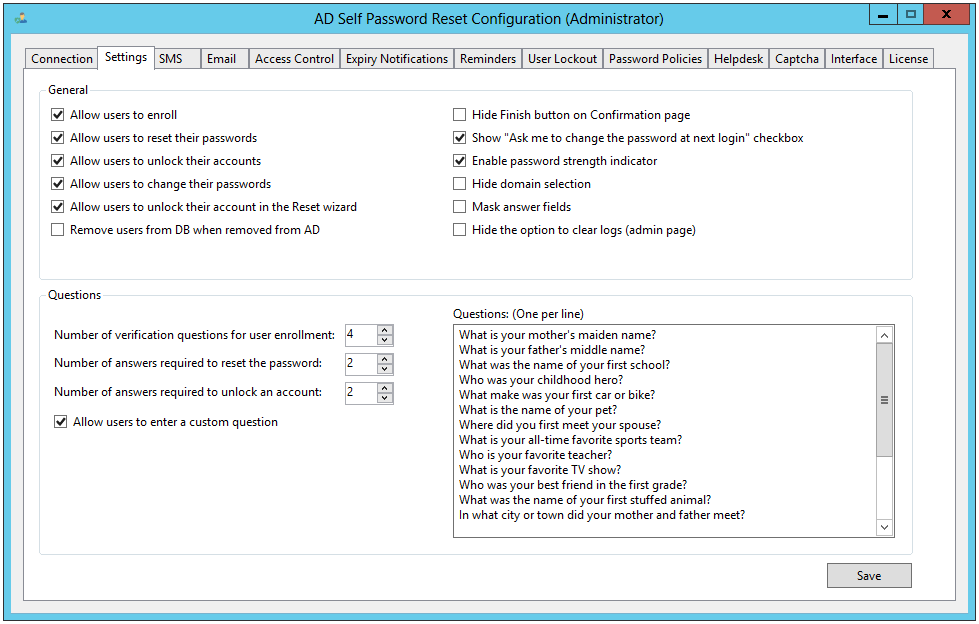
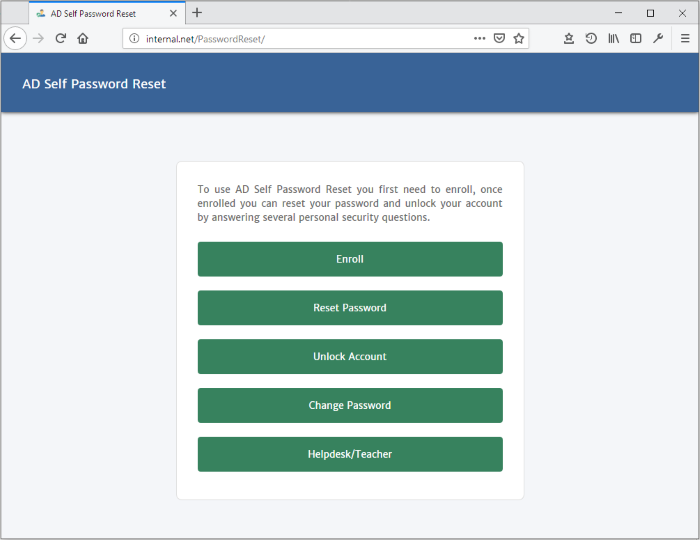
Initial configuration is now complete; you can continue to configure the program or perform some initial tests by going to the URL where the program is installed e.g. http://serverName/PasswordReset. Using HTTPSWe strongly recommend you use SSL to encrypt the traffic when live but this is not required. You can test the program using HTTP if you are testing internally. Once live we do recommend you install a SSL certificate so the web site is accessible using HTTPS.The page below explains how to enable HTTPS in IIS. You can find other examples of how to enable https and add an SSL certificate can be found online. https://support.microsoft.com/en-gb/help/324069/how-to-set-up-an-https-service-in-iis General SettingsOn the ‘Settings’ tab in the Configuration program you will find a section labelled ‘General’. On the left are options that enable or disable program features. For example, unchecking ‘Allow users to unlock their accounts’ will remove this option from users. On the right are options that enable or disable minor features such as masking user passwords as they enter them or hiding the domain selection drop down.
“Ask me to change the password at next login” Checkbox FunctionalityWhen the option “Show ‘Ask me to change the password at next login’ checkbox” is enabled, users can configure how this checkbox will behave during password reset. There are four available modes:
These modes allow administrators to control both the visibility and interactivity of the checkbox based on the intended behavior.
Reset by QuestionsShould users forget their password they can reset it by answering a number of questions only the know they answer to. The administrator can decide how many questions need to be answered successfully before a user can reset their password. To reset their password by answering questions users need to first ‘Enrol’, this involves first verifying their identity by authenticating with their current username and password and second choosing which questions they want to be asked and providing answers to those questions. The administrator can choose which quest questions users can choose from and how many questions your users will be asked during enrolment and how many questions they will need to answer to reset their password. The default questions can be changed, removed or added to. There is also the option to allow users to enter a custom question, this allows users to create their own question which may be unique to them. Choosing Questions Pay close attention to the type of questions the users can choose, take care not to choose questions were the information is easily learned, for example asking, ‘Where colour is your car?’ is easily learned. A more secure question to ask would be ‘Where did your parents meet?’ as this could be a city, location or an event. Allowing the user to create their question can add security as the user may ask a question only they could ever know the answer to. The user is limited to creating just 1 question to ensure they don’t create too many easily guessable questions.
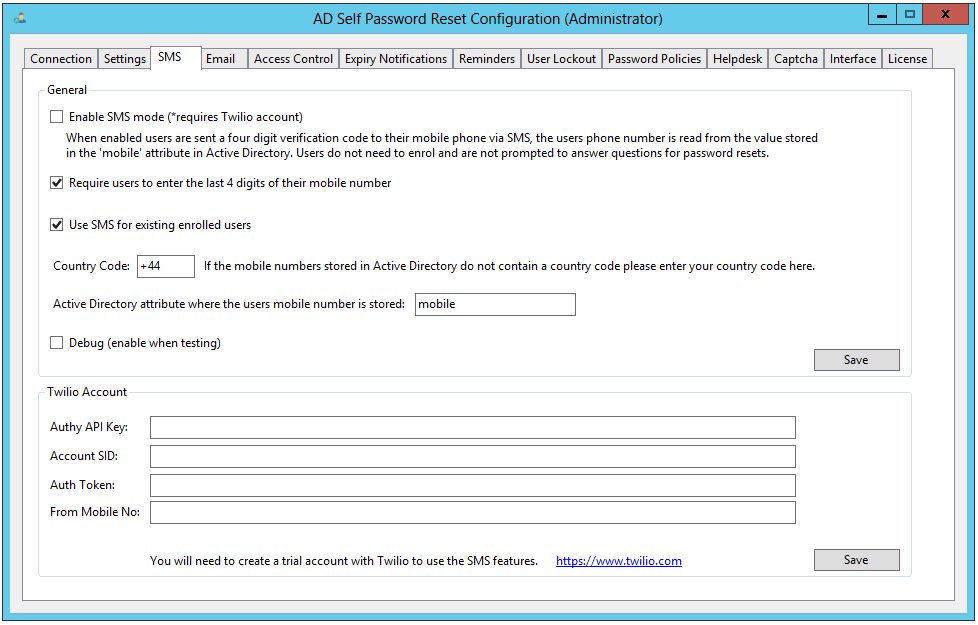
Pre-enrolment Whilst it is recommend users enrol themselves and answer their own questions in some circumstances such as education environments you may need to enrol users in bulk. You can bulk import users using the included program PasswordResetPrePopulater.exe, there is an included csv file which can be used as a template. Reset by SMSThe SMS mode allows users to reset their password without the need to enroll. If the user has a mobile number stored in Active Directory then when the user goes to Reset their password a message is sent to their mobile containing a password reset code. The user is then prompted to enter the code, if the correct code is entered the user can reset their password.
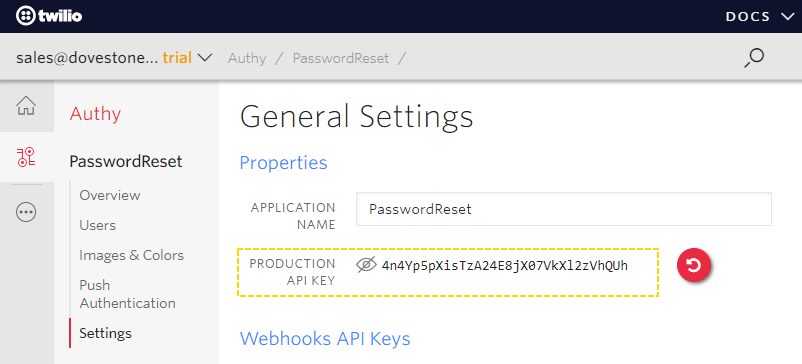
Require users to enter the last 4 digits of their mobile number When the option ‘Require users to enter the last 4 digits of their mobile number’ is checked users will be asked to confirm the last 4 digits of their mobile number before they can proceed. Country Code If the users mobile number stored in Active Directory does not contain a country code then you can enter a country code here. Use SMS for existing enrolled users The option ‘Use SMS for existing enrolled users’ will force all enrolled users to use SMS rather than answering questions. This is ideal for customers who already have enrolled users and want to switch to SMS only. If the option is unchecked enrolled users will be asked to answer questions when they click Reset and new users who have a mobile number stored in Active Directory will use SMS. This helps if you want some users to use questions/answers (if they don’t have a mobile) and you want some users to use SMS (they don’t need to enroll). Twilio Account To send the SMS messages the program uses Twilio a global SMS service. A free Twilio account for testing can be created at twilio.com. Twilio offer a trial to all customers who sign up, which includes a free balance for you to experiment with. Getting a Twilio API key is straight forward, simply register with Twilio, once registered locate Authy in the menu and add an ‘Application’, give the application a friendly name such as PasswordReset then copy the API Key from the Settings section of the Application you created and paste it into the API Key text box on the SMS tab.
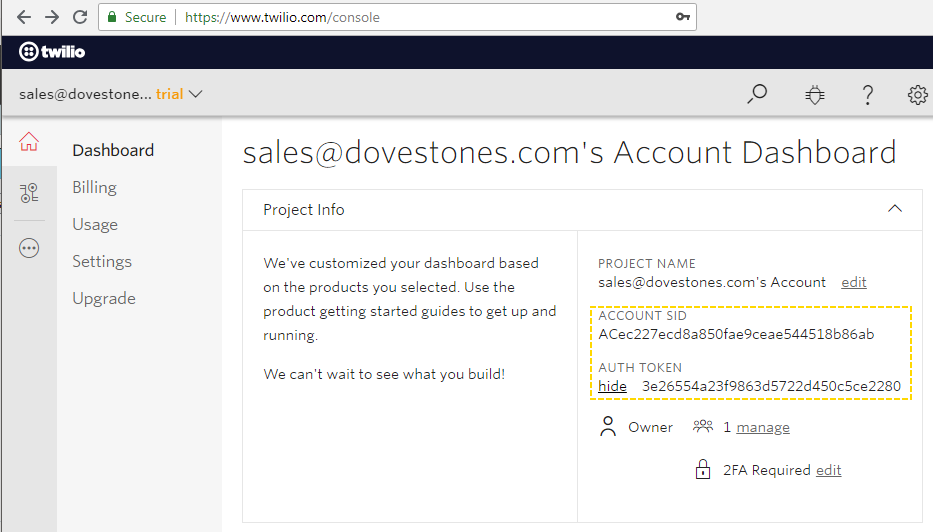
You will also need to enter your Account SID and Auth Token values which you can find on your Twilio dashboard.
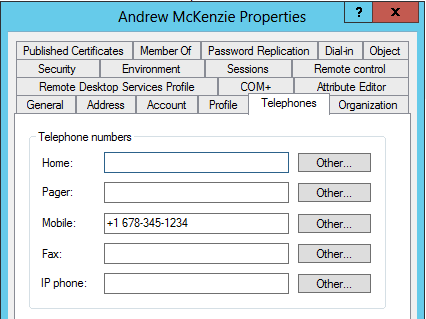
By default the program send the SMS message to the number stored in the mobile field. This attribute can be changed should the number be stored in another attribute.
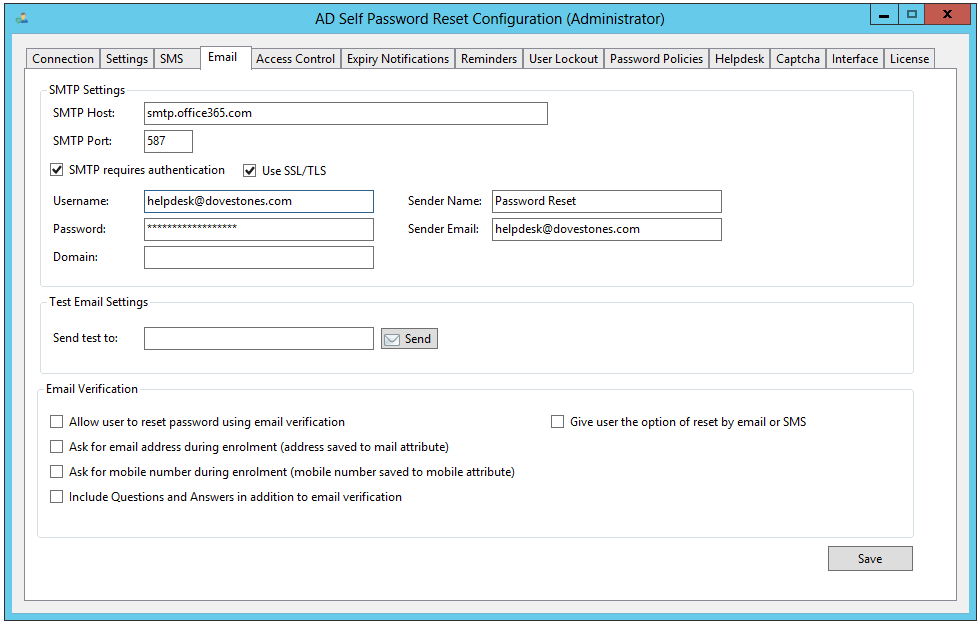
Debugging SMS Whilst testing you may find you aren’t receiving the SMS messages, there are a few reasons for this. Enabling the ‘Debug’ option on the SMS tab gives you a little more information should the program not be able to successfully send the SMS message. When it is working as expected you can disable this option. Email SettingsWhen a user enrols, resets or changes their password they are sent an email confirming the change has taken place. On the Email tab you can configure settings for your email server. The password expiry notifications are also sent via email. Enrolment reminders sent via the admin page also require an email server to be configured. Enter the details of your mail server, the example below is using Office 365 but this could be your local Exchange server or another SMTP server.
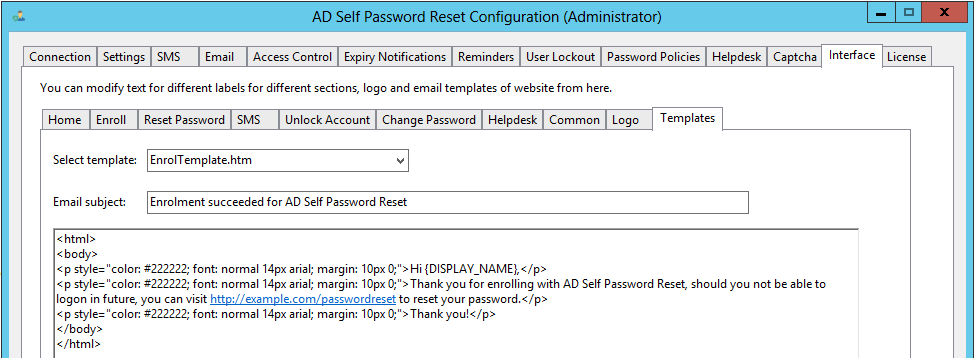
Email Templates The emails that are sent to the user when they enrol, reset or change their password can be customized via the Interface tab in the configuration program. The email templates files are located in the App_Data folder (typically c:\inetpub\wwwroot\PasswordReset\App_Data\).
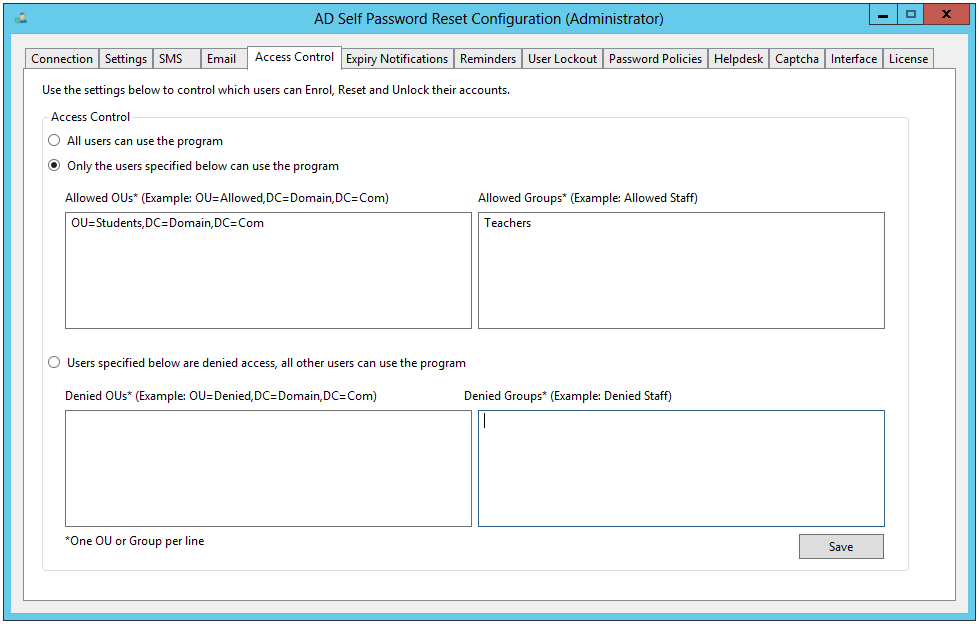
Reset by Email and Email VerificationIf users have forgotten their password and you don’t want them to enrol (i.e. Answering Questions) and you don’t want to use SMS then a third option is to allow users to reset their password via email. This works in a similar way to the common ‘I’ve forgotten my password’ you find on most web sites. If the option ‘Allow users to reset password using email verification’ is enabled then when users click the ‘Reset’ button (you can link directly to /reset) and enter their username, an email is sent to the address stored in the ‘mail’ attribute (in later releases you will be able to specify a different attribute). The user clicks the link in the email and they are redirected to a page were they can enter a new password. Include Questions and Answers in addition to email verification After the user clicks the link in the email you can ask them to answer questions before they can reset their password, this does require the user has previously enrolled. To enable this check the option ‘Include Questions and Answers in addition to email verification’. Ask for email address during enrolment Should you not have your users email address stored in Active Directory then you can ask the user for their email address as they enrol. Their email address is then saved to the mail attribute in Active Directory, this then allows you to enable the ‘Allow users to reset password using email verification’. Ask for mobile number during enrolment Should you not have your users mobile number stored in Active Directory then you can ask the user for their number as they enrol. Access ControlFor additional security the Access Control tab allows you to control which users can use the program. You can specify which groups or OUs (Organizational Units) are allowed or which groups or OUs (Organizational Units) are denied use. By default all users can use the program.
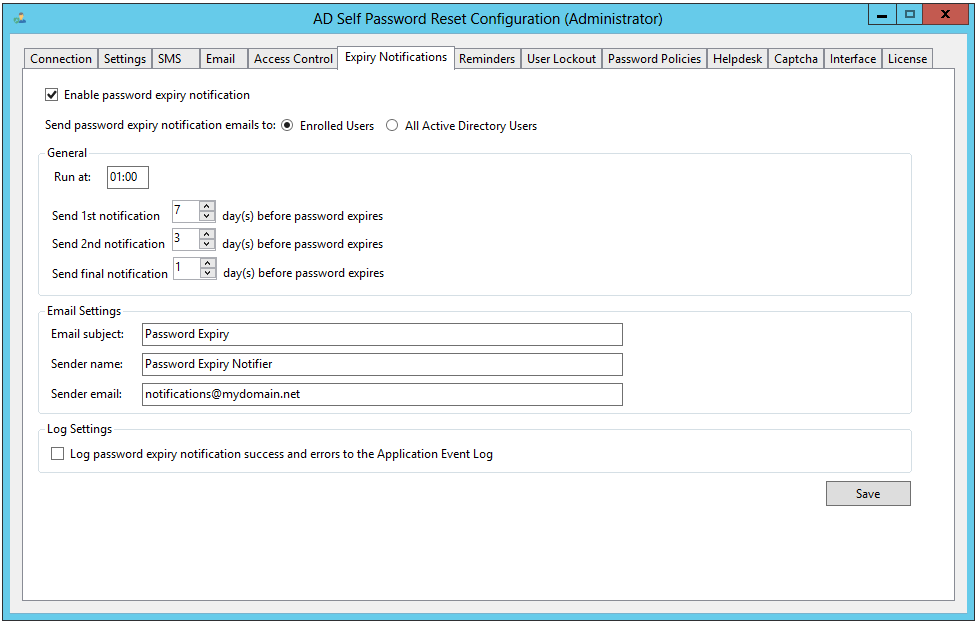
Expiry NotificationsWhen a user’s password is due to expire they can be notified via email, this may prevent them from forgetting their password in the first place. When the password reminder email is sent the user can click a link in the email which redirects them to the ‘Change your Password’ page (email templates can be customized via the Interface tab). You can set the frequency users are notified their password will expire. Expiry notifications can be disabled should you not want to use this feature.
Admin PageThe Admin Page provides functionality for managing users, sending enrollment reminders, and reviewing user activity logs. It is accessible directly through the URL. Examples include http://localhost/passwordreset/admin, http://servername/passwordreset/admin, or http://10.0.0.5/passwordreset/admin. When using a custom domain, the page can be reached by appending /admin to the base address. It is important to note that the Admin Page can only be accessed via a URL that includes the server name or IP address. Access to the Admin Page is restricted. Only members of the security groups listed in the web.config file are permitted. A typical configuration might look as follows: <add key=”Administrators” value=”Administrator,BUILTIN\Administrators,Domain Admins,ADSelfPasswordResetAdmins,ADSelfPasswordReset” />
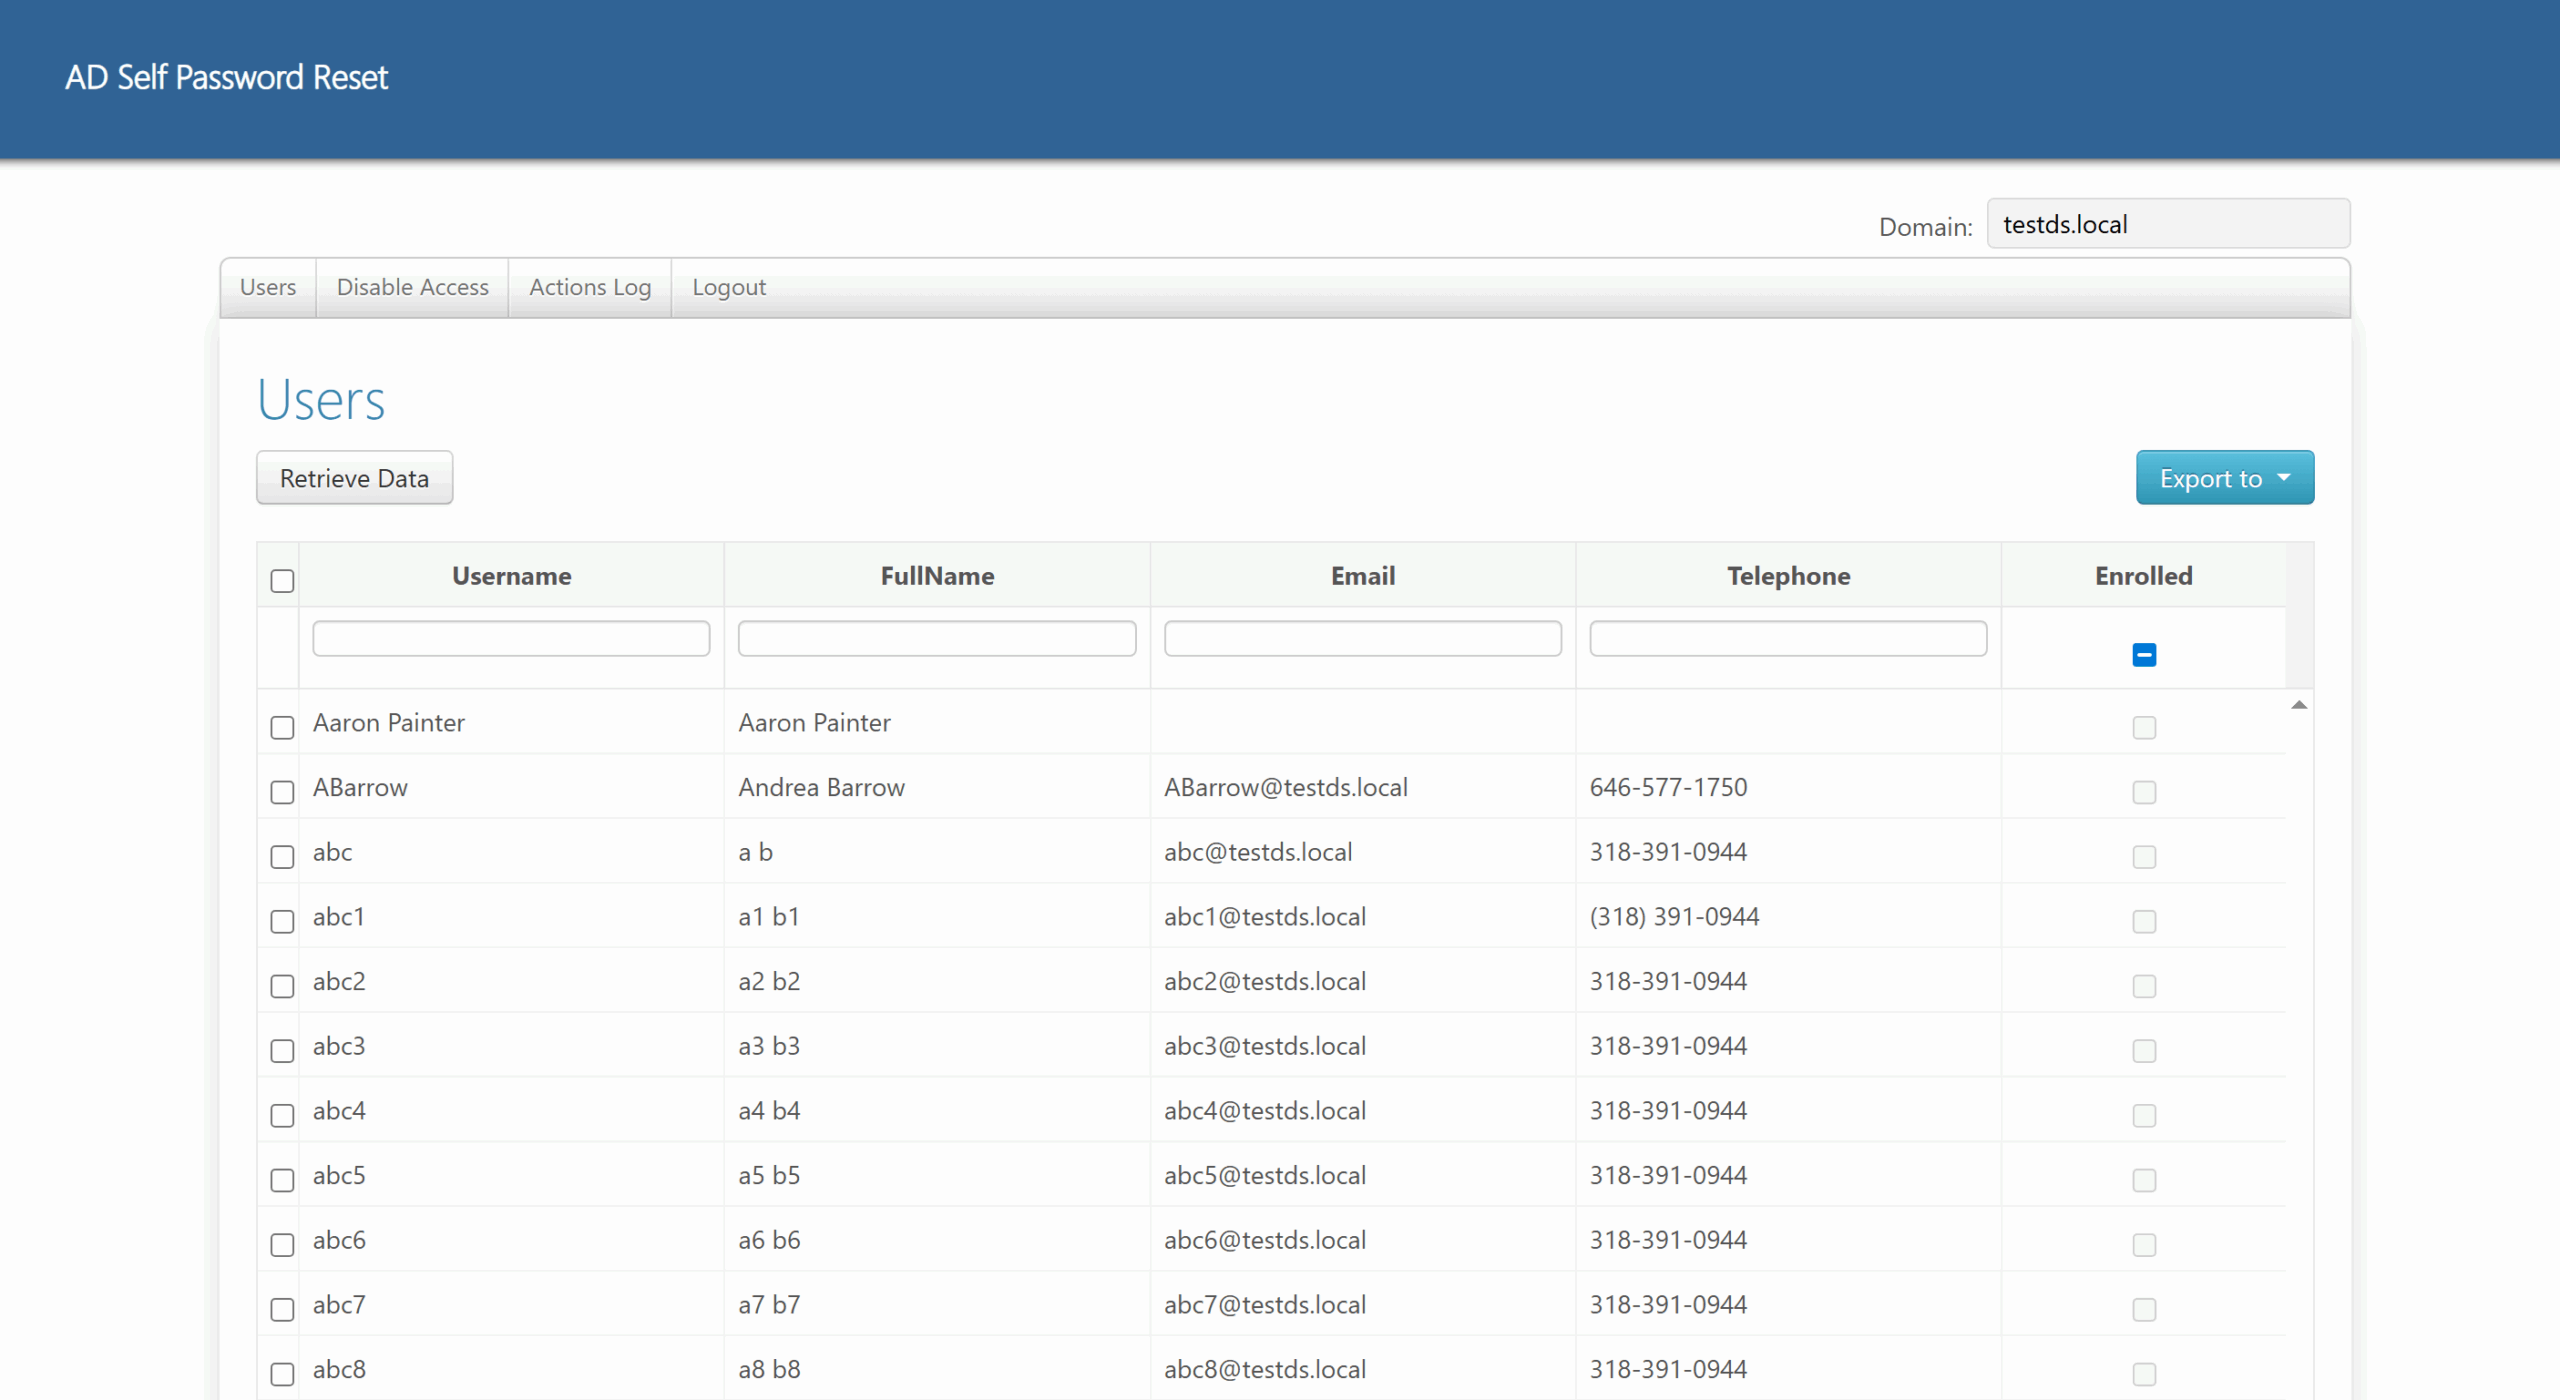
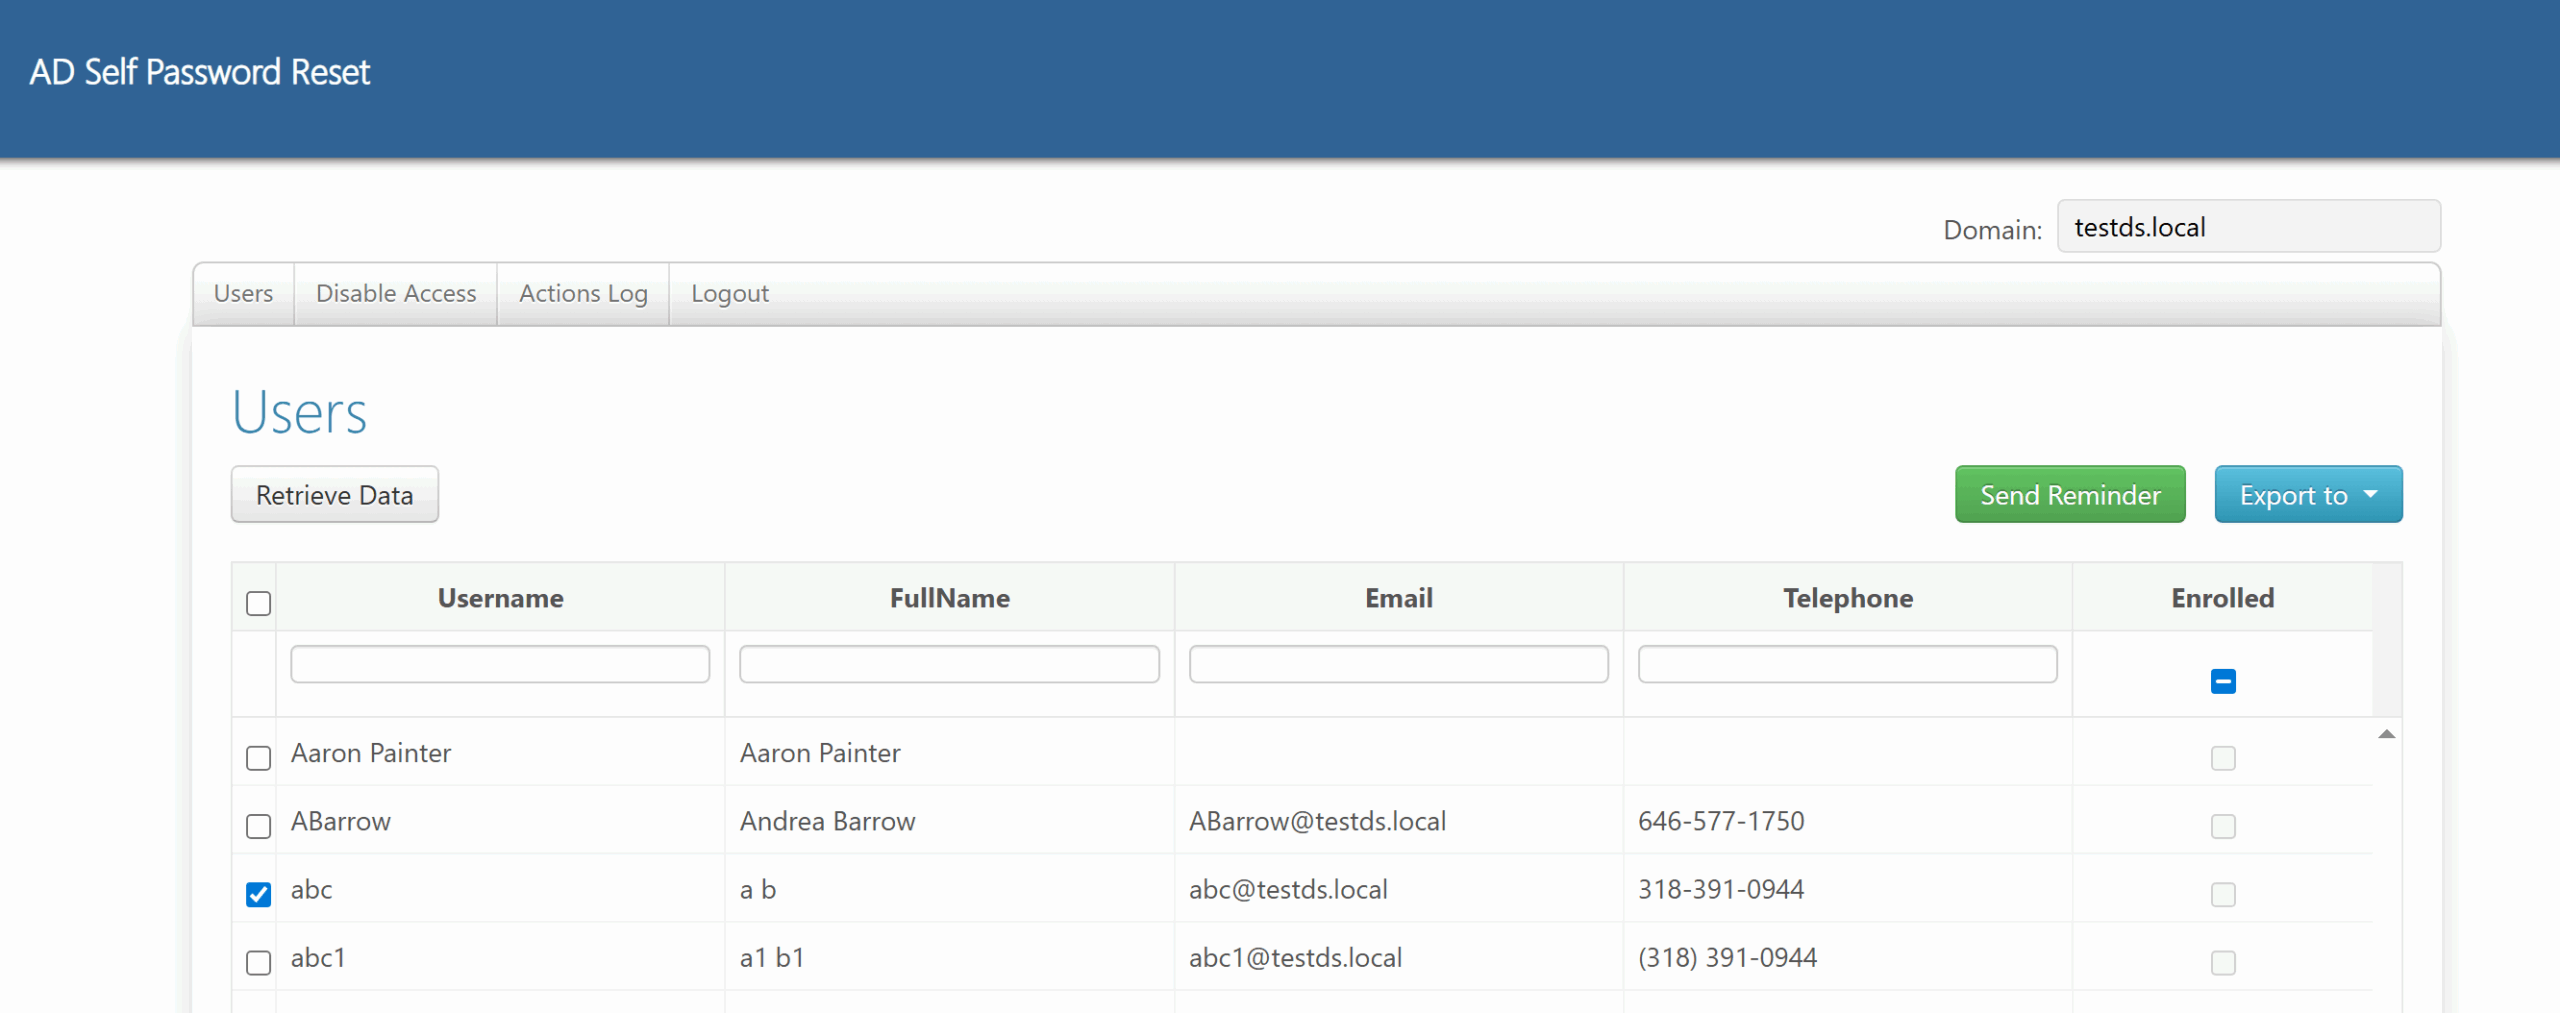
Admin Page – Reminders to UsersWhen you open the Admin Page, the first view displays the list of users. To retrieve data, click the Retrieve Data button and the system will display the complete user list. Each record includes an “Enrolled” column, which indicates whether the user has completed enrollment. If a user has not enrolled, you may remind them to complete the process. To do this, select the checkbox next to the user, after which the Send Reminder button will appear. Once clicked, the system will send the enrollment reminder to the selected user.
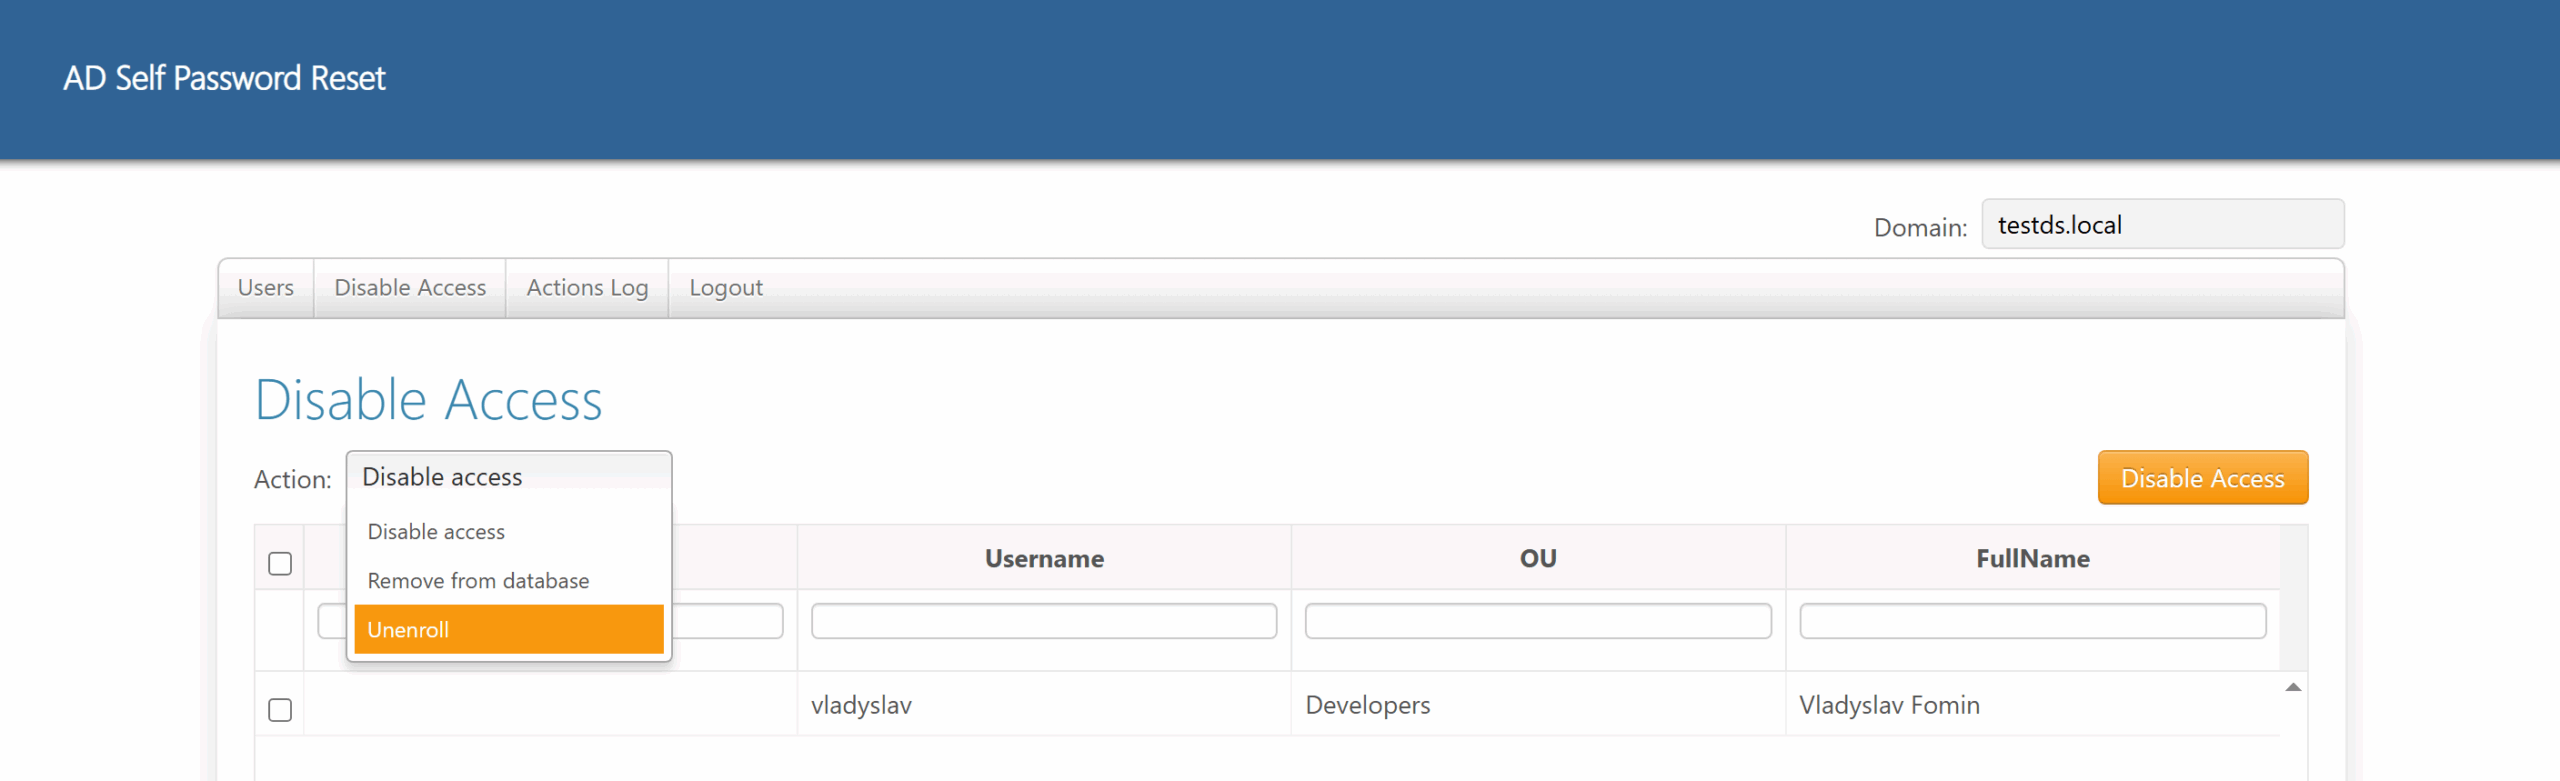
Admin Page – Actions with UsersThe Disable Access section provides options to manage user accounts. Within this area, it is possible to disable access for a user, remove a user from the database, or unenroll a user. After selecting the required action from the dropdown menu, the page will display all users who are eligible for that action. If no users qualify, the list will remain empty.
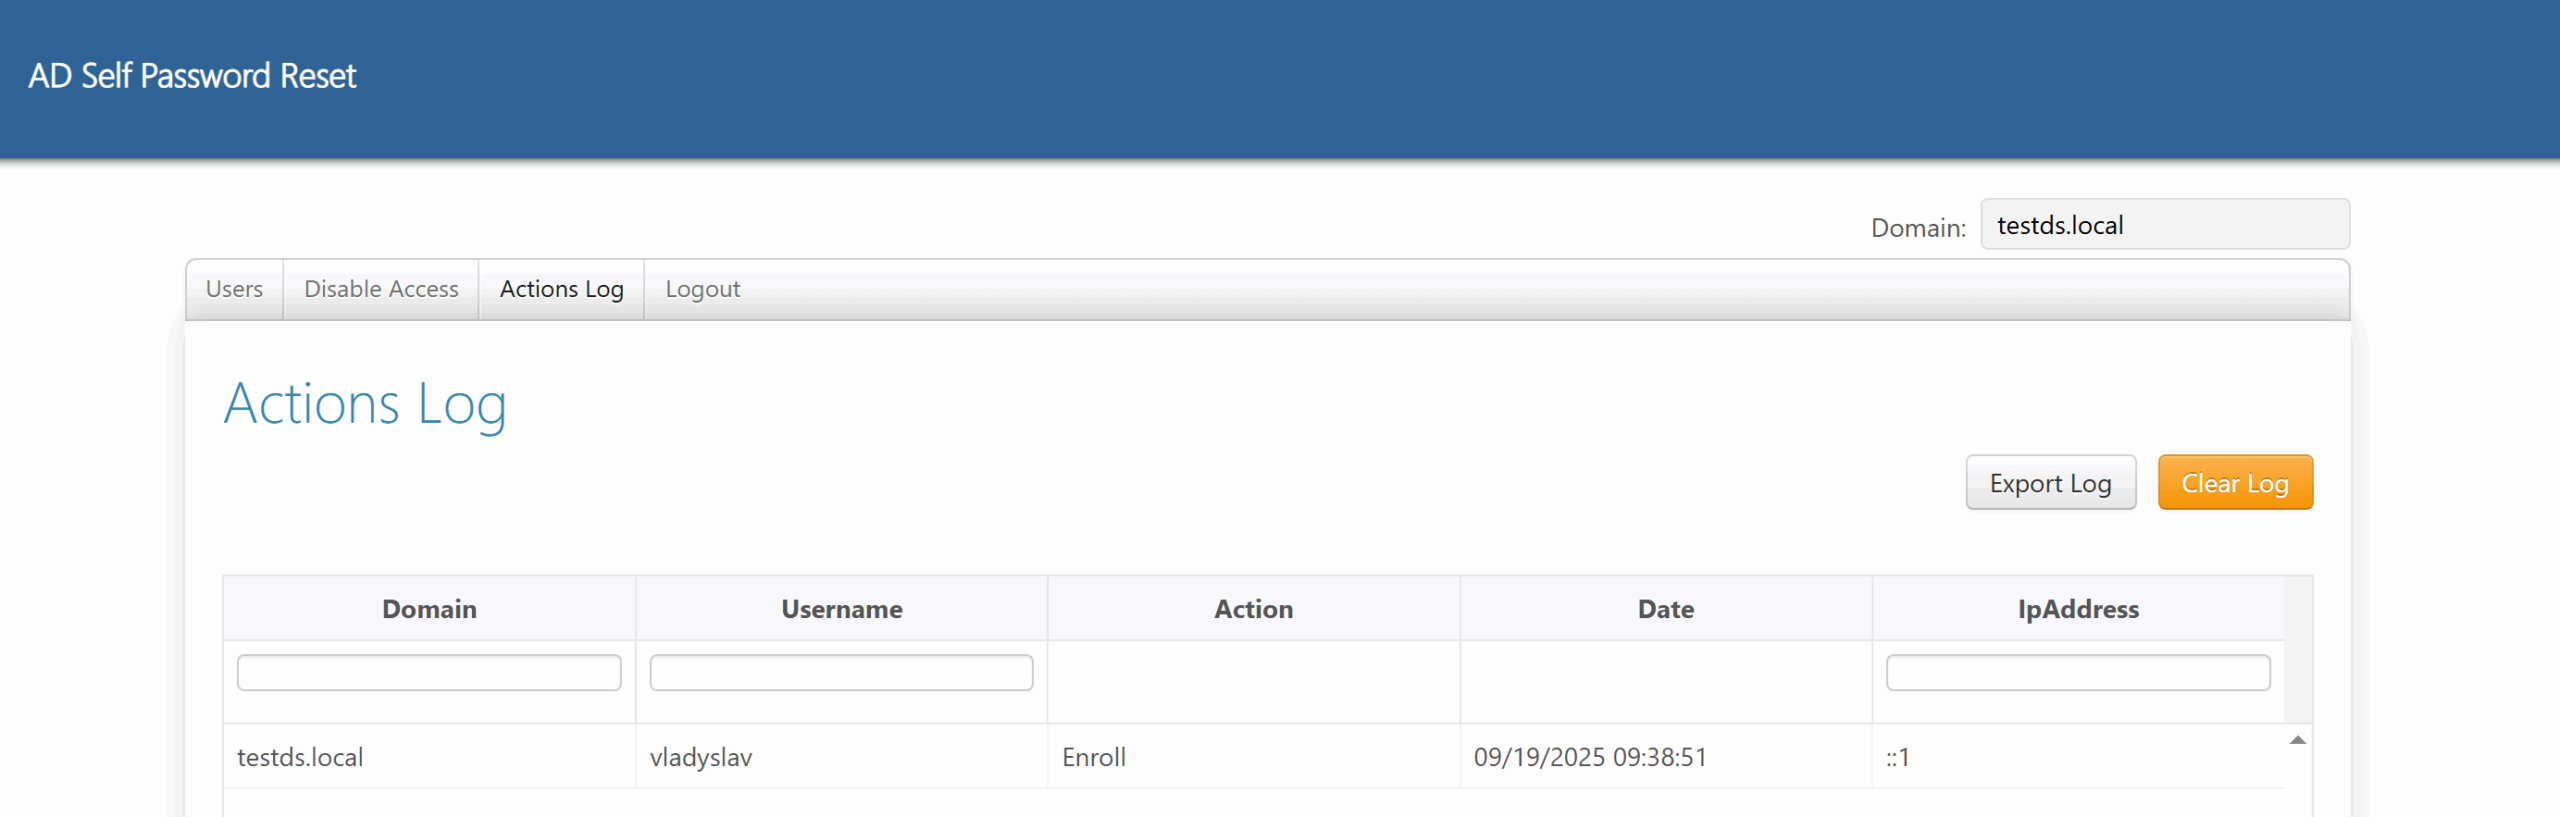
Admin Page – Actions LogThe Actions Log allows you to review the activities performed by users. This page provides an overview of the actions recorded within the system and also includes the option to export the logs. Exporting makes it possible to analyze the data further on your local machine if required.
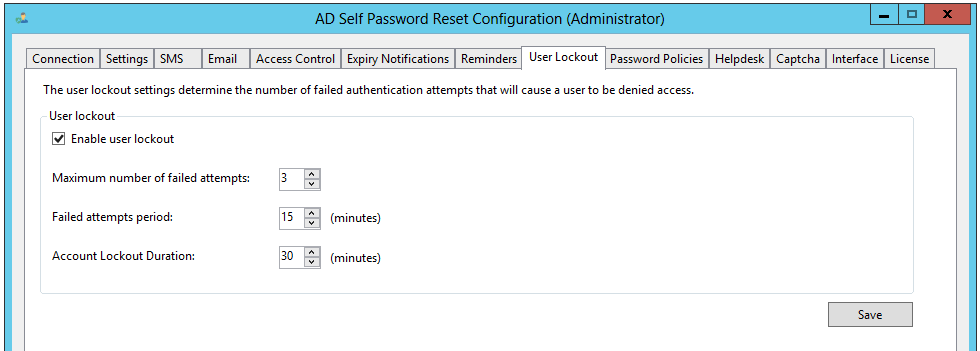
User LockoutShould a user repeatedly provide incorrect answers the program can prevent further attempts at guessing the answers by locking the user for a specified amount of time. On the User Lockout tab you specify how many failed attempts would prevent access and how soon they are allowed to try again. To prevent scripts being run to gain access use Captcha tab.
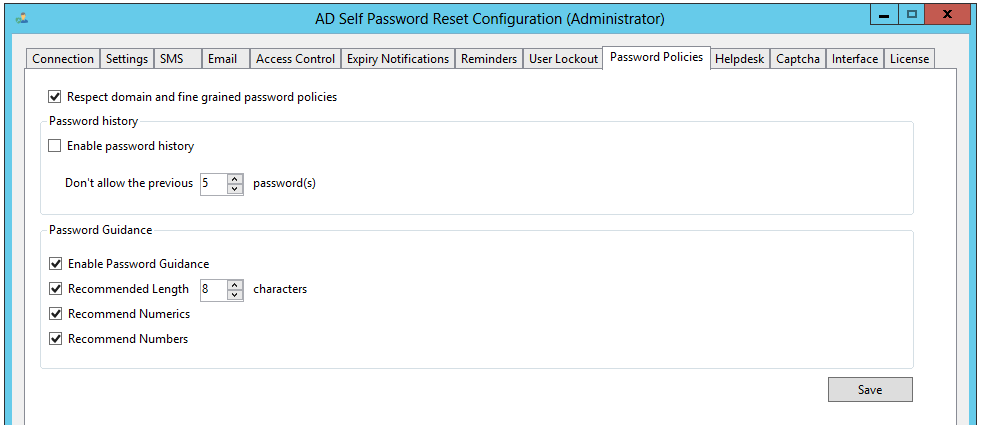
Password PoliciesBy default, the program will ensure passwords being set conform to the domain password policy, you can disable this check should you need to on this tab. To prevent users using the same password continuously you can enable the password history feature. This forces the user to choose a different password each time.
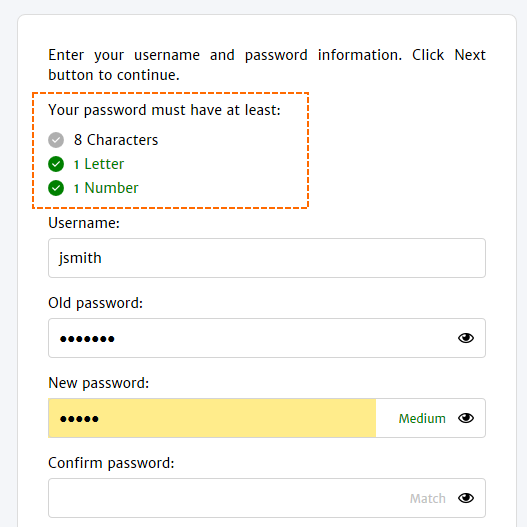
The Password Guidance options provides a user with visual feedback about the strength of their password. The Password Guidance isn’t linked to the password policies that exist in Active Directory, it can be enabled to encourage users to set a stronger password. The password the user specifies will need to meet the password policies you have in place if Password Guidance is enabled or not.
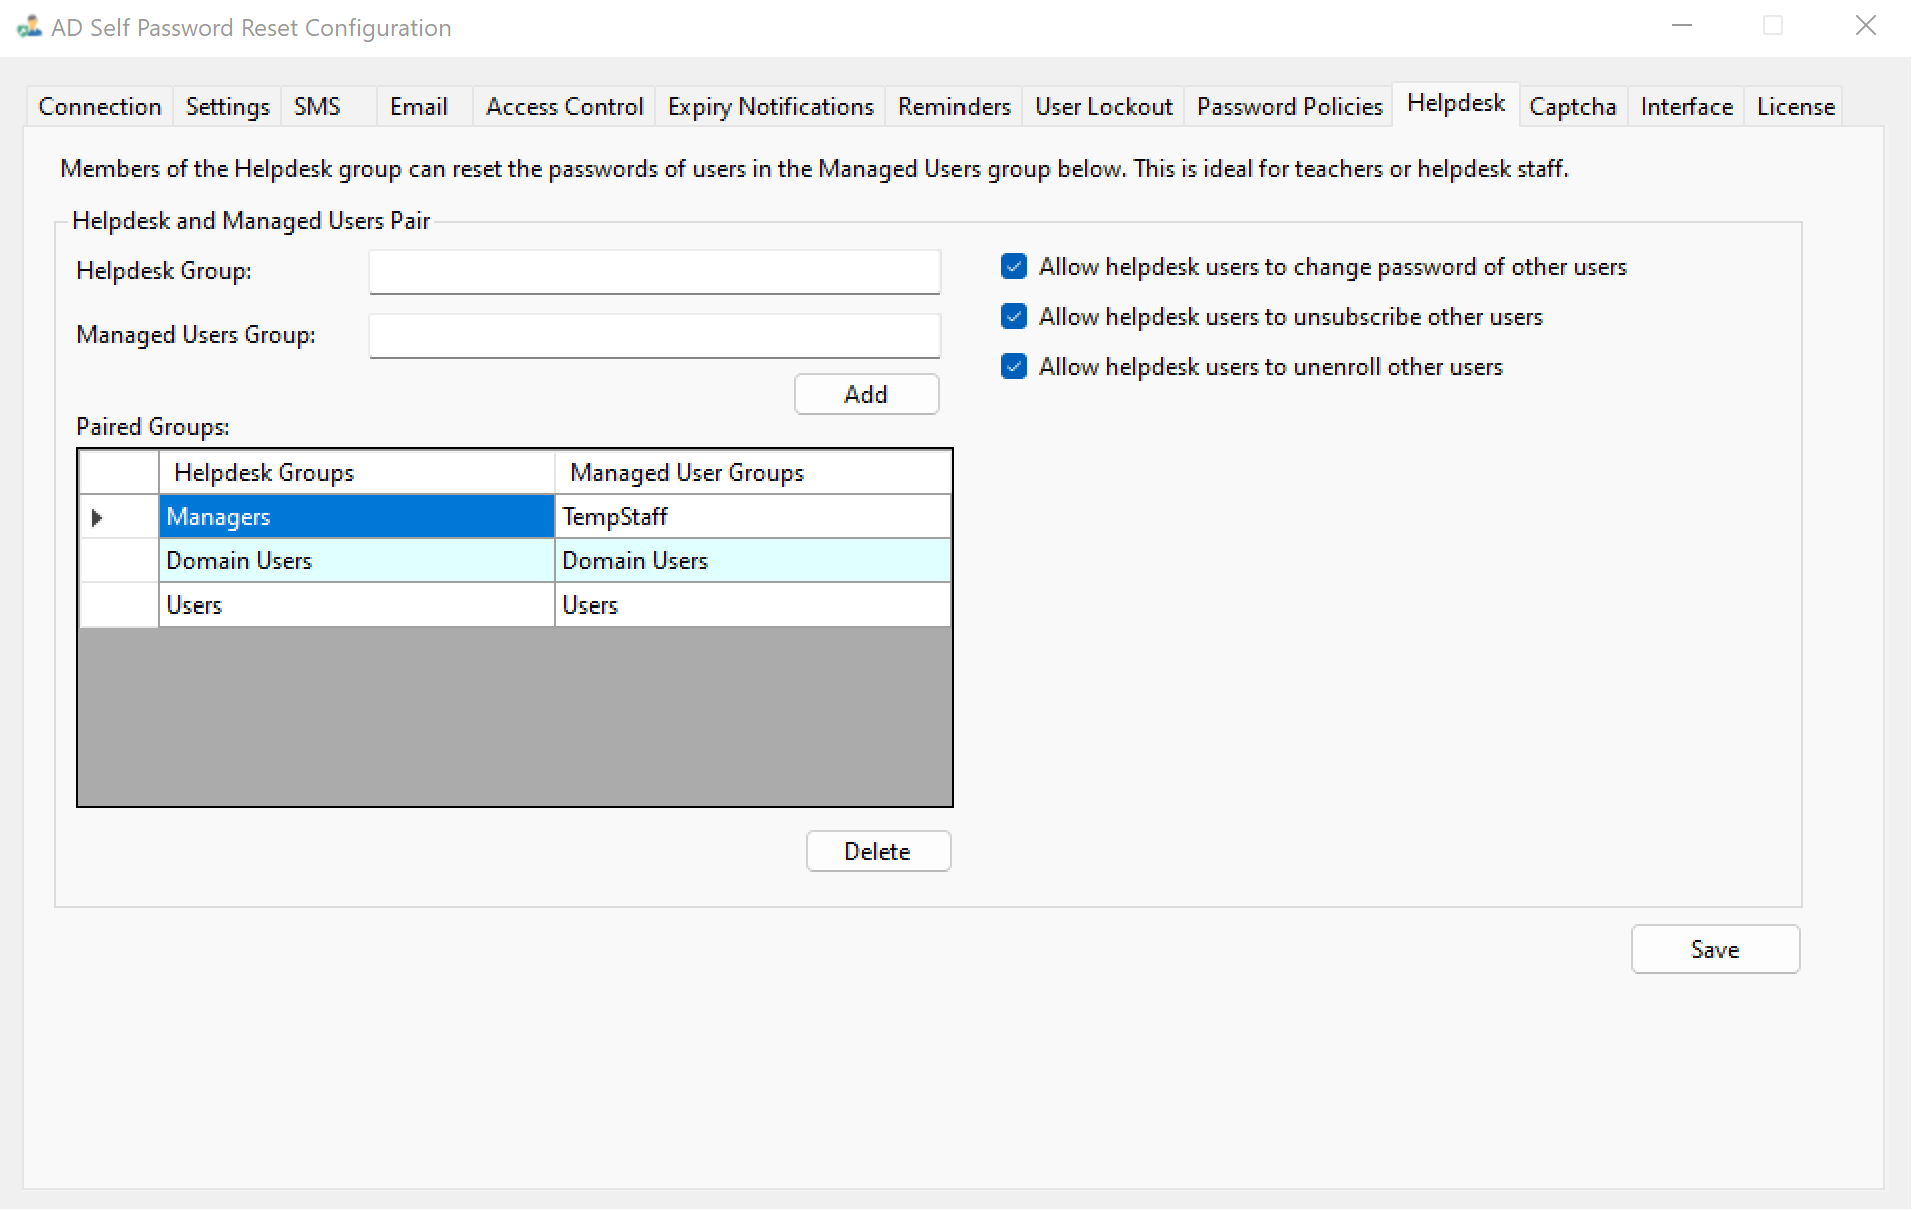
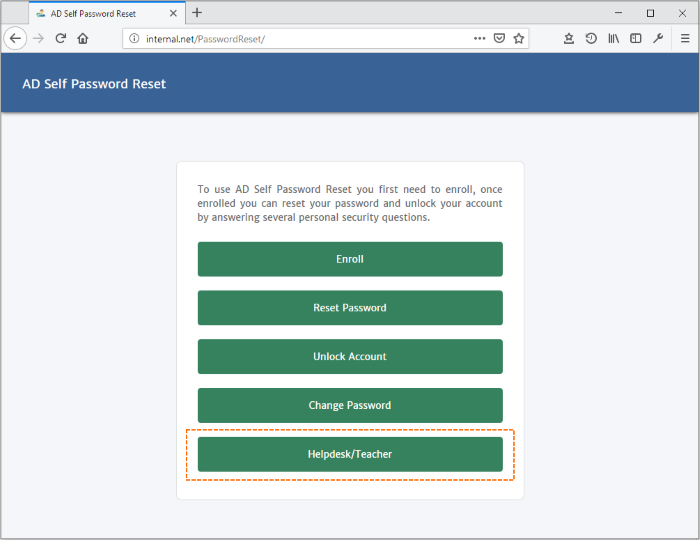
HelpdeskYou can allow a specified group of users the ability to change the password of another group of users. The feature is ideal for teachers as they can reset students passwords so there is no need for students to enroll or call the IT department, students don’t need to be enrolled for the tutor to use this feature. It can also be used by Helpdesk staff so they don’t need to access Active Directory to reset passwords. To use this feature, add the name of both groups and click Add and then Save. Enabling the Helpdesk feature will add a button to the main page, the Helpdesk/Teacher button can be used by members of the Helpdesk group, other users will be denied access. You can change the text shown on this button on the Interface tab.
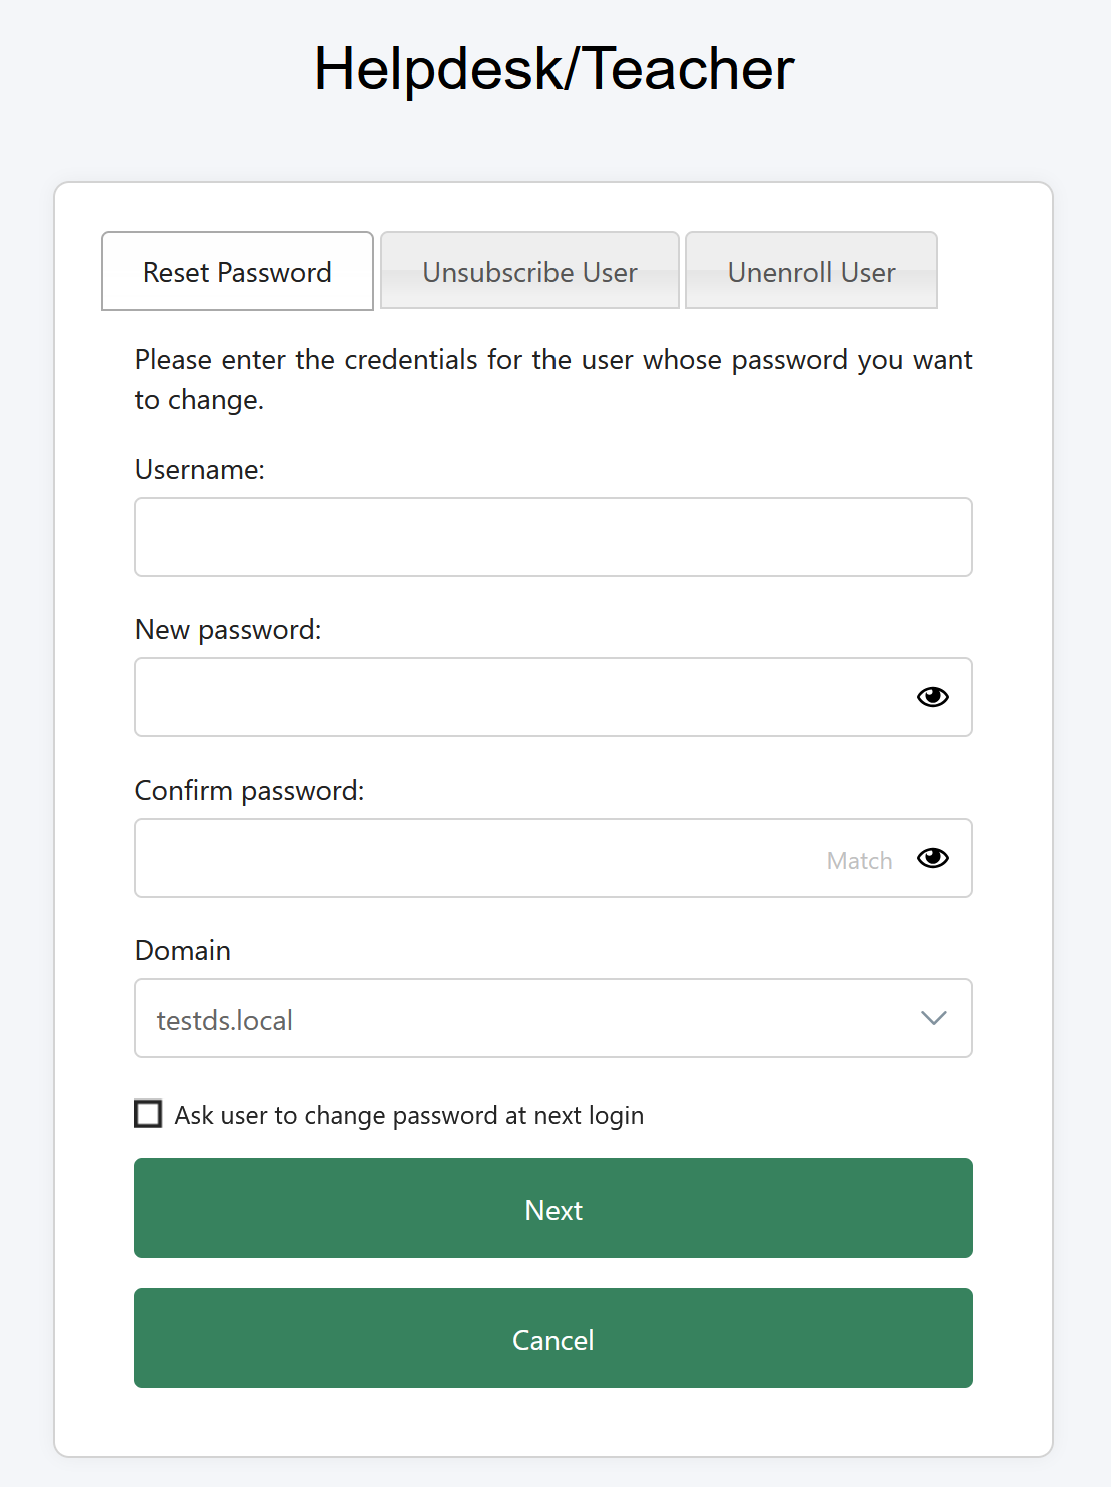
Helpdesk – Changing Password for Other UsersIn the Configurator application, there is an option called “Allow helpdesk users to change the password of other users.” This setting controls the main helpdesk functionality. If disabled, helpdesk features will not be available. If enabled, helpdesk users will be able to reset passwords for other users. To perform a password reset, the helpdesk user should open the “Reset Password” tab, enter the username and the new password. There is also an option to force the user to change the password at next login. The behavior of this checkbox depends on the application settings.
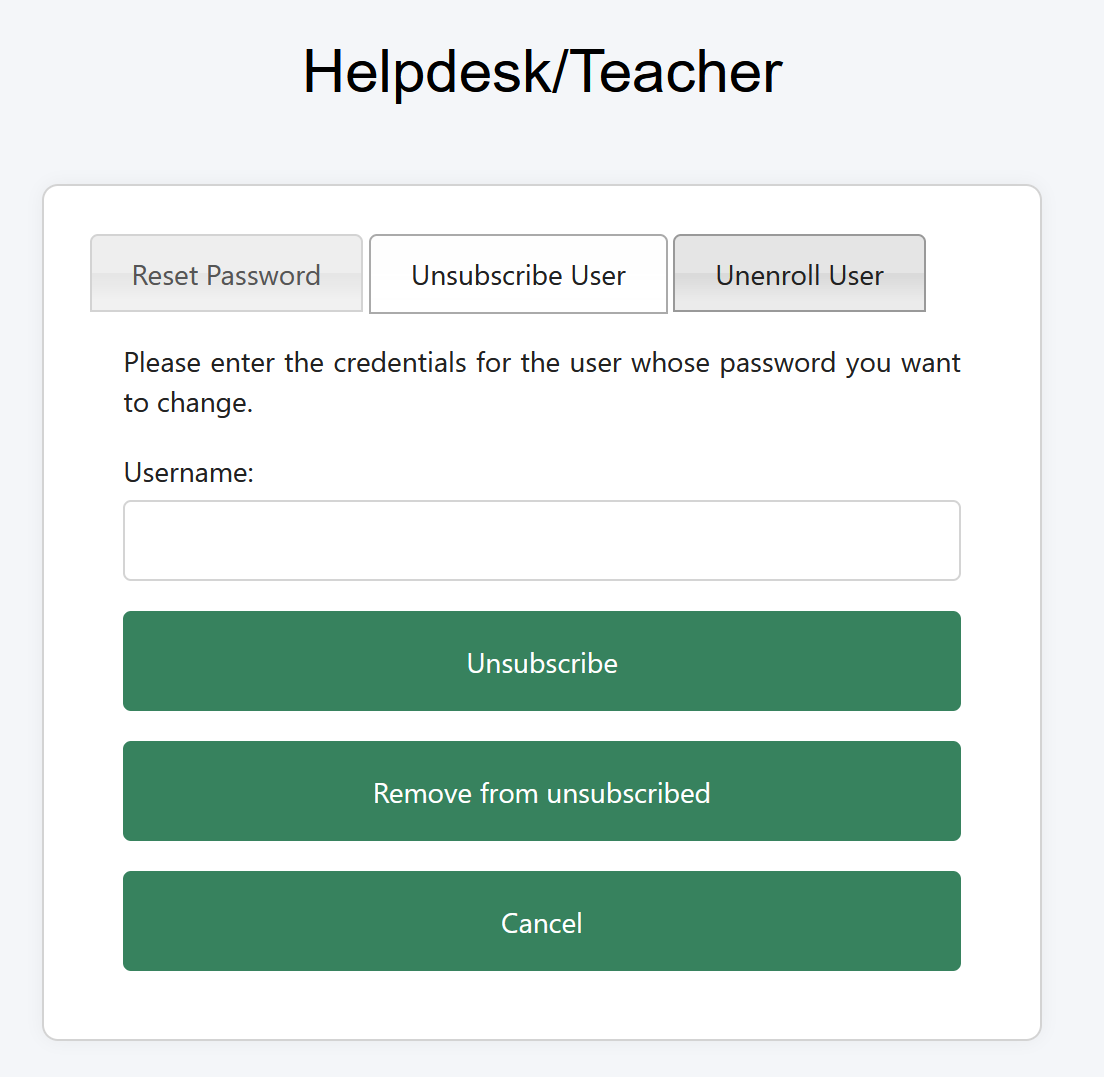
Helpdesk – Unsubscribing Other UsersIn the Configurator application, you will find the option “Allow helpdesk users to unsubscribe other users.” When this option is enabled, helpdesk users can access the “Unsubscribe User” tab and use the unsubscribe feature. Unsubscribing a user means removing them from the enrollment list and moving them to the unsubscribed list. This action is logged in the database to keep a history of changes. To unsubscribe a user, the helpdesk person must open the “Unsubscribe User” tab and enter the username.
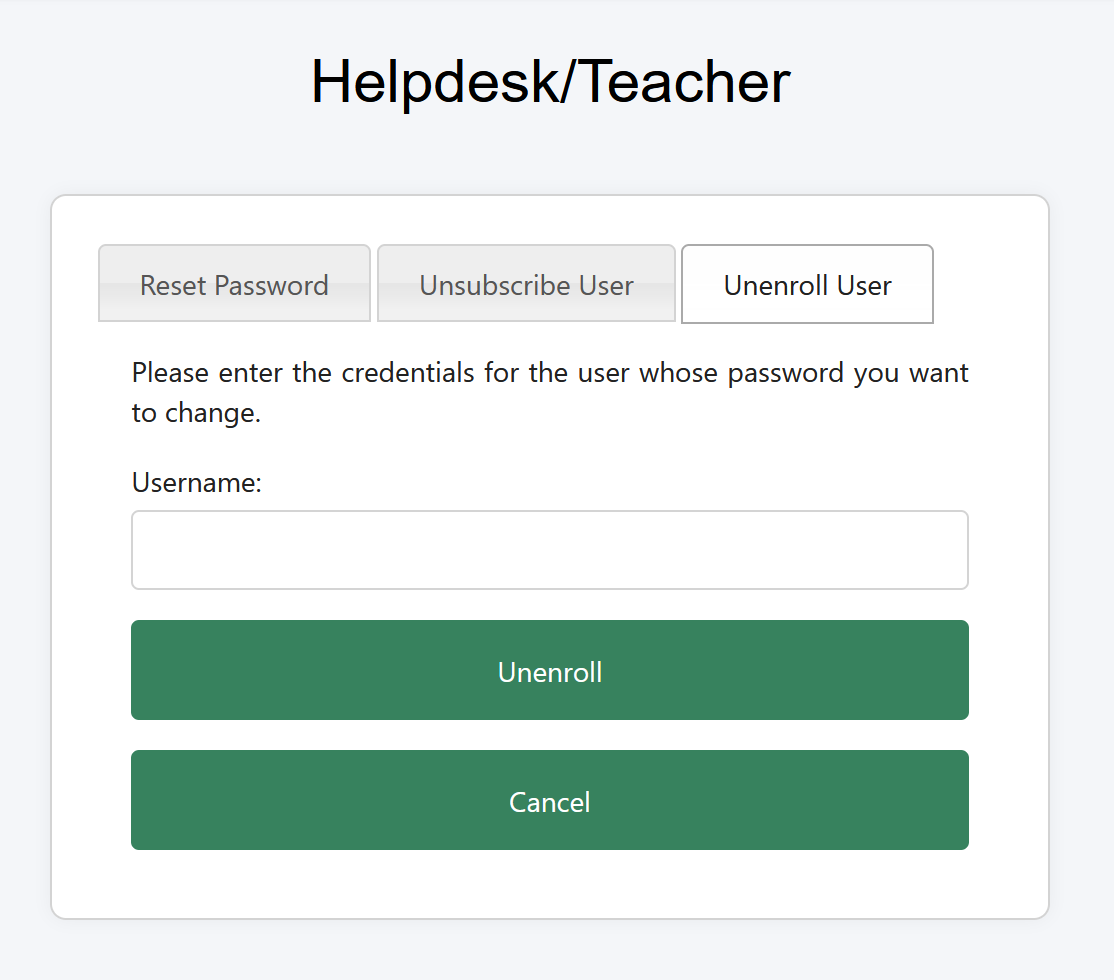
Helpdesk – Unenrolling Other UsersThe Configurator application also includes an option “Allow helpdesk users to unenroll other users.” When enabled, this allows helpdesk users to access the “Unenroll User” tab and perform full unenrollment. Unenrolling a user means completely removing their data from the application database. It is equivalent to the user never being enrolled. All associated logs and history will be deleted. To unenroll a user, the helpdesk person should open the “Unenroll User” tab and enter the username.
CaptchaCAPTCHA (Completely Automated Public Turing test to tell Computers and Humans Apart) is a challenge-response test used to determine whether or not the user is human.
The CAPTCHA is shown when a user tries to reset their password or unlock their account. The CAPTCHA is shown before the user enters any details other than their username to ensure the user is human before attempts to answer questions are made.
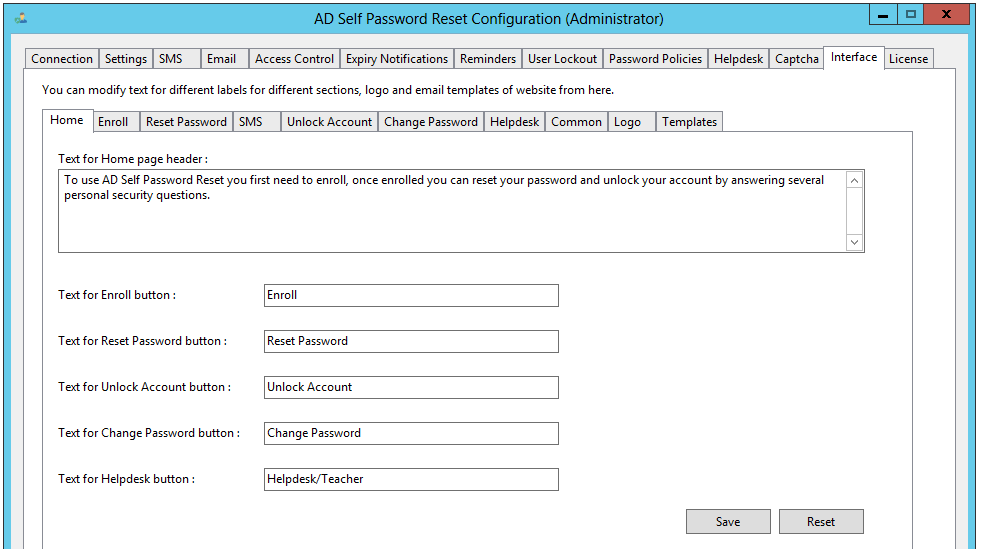
Customizing the InterfaceAll the text seen by users (buttons, labels, colours and messages) can be changed via the Interface tab, you can also add a logo and change the colours used on the buttons and header. The logo should be 185px wide by 60px high and no larger than 30kb.
User EnrolmentUnless you are using SMS or Email verification modes your users will need to enroll before they can reset their passwords. Enrollment only takes a few minutes and involves entering their username and password to confirm the users identity and then answer a number of questions. The Change Password option doesn’t require enrollment. Which questions the user can choose from and how many they need to answer to enroll are defined by the administrator via the Settings tab in the Configuration program.
To enrol your users will need to visit the main page and click Enroll or you can link directly to the enrolment page, perhaps in an email. E.g.
User Password Reset
Unlock Account
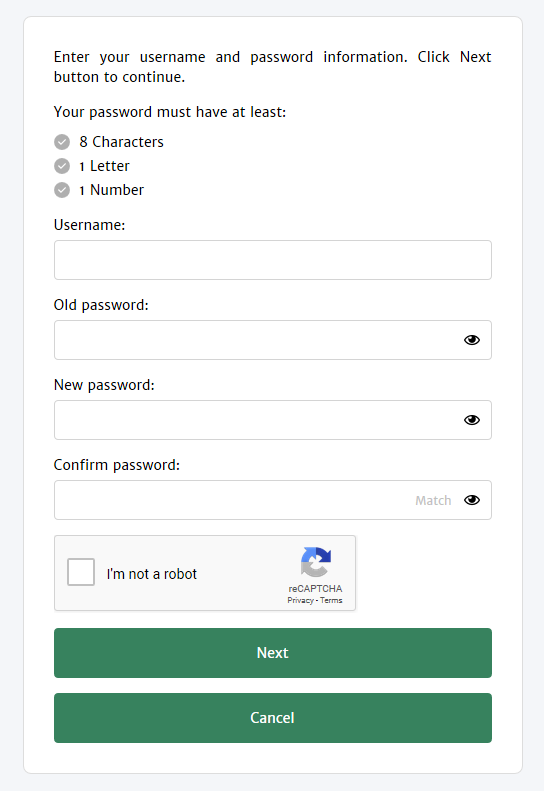
Change Password
Help and SupportIf you require any help installing or configuring AD Self Password Reset please contact support.
|
|---|


Footer
Dovestones Software
Copyright 2005 – 2023 © Infoopia Inc.
All rights reserved.
Registered office:
Infoopia Inc.
PO Box 93383
Newmarket Ontario
L3X 1A3
Canada
Phone (voice mail):
Toll-Free 1.877.335.8909
Outside of US/Canada +1.647.478.8078
Our Newsletter
Subscribe to our newsletter to receive the latest updates.
You can review our privacy policy here.