| Last updated 8 November 2018Contents: Introduction AD Phonebook Technical Support Prerequisites Installation Add a service account Domain Configuration Accessing the AD Self Update Accessing the Admin page Configuring Sections Field Types Common Field Properties Number Field Date Field Memo Field List Field Dependent List Field Hyperlinks Helpdesk Log files Customization Add and remove attributes Appearance Customizing Header/Footer Add a logo Using Windows Authentication Using HTTPS Help and Support |
IntroductionAD Self Update allows users to update their details that are held in Active Directory, it also provides a way for delegated users to update other users details in a safe manor without the need to use Active Directory Users and Computers. AD Self Update is fully configurable, you can fully customize what your users will see and can edit. You can add fields, remove fields, group fields, set certain fields as read-only. You can change the look of the program by adding your own logo and changing the colours, headings, title, the labels and brand it with your own colours and logo. The main form allows your users to view and update their own information, the administrator has control to decide which fields will be updated. Examples of these fields are mobile number, home phone number, address or other attributes such as Car License, custom attributes etc. One of the programs stand out features is the Helpdesk mode, this allows specified users such as Helpdesk or HR staff update other users details without needing access to Active Directory. You can specify which attributes/fields the Helpdesk staff/HR staff can update. AD PhonebookAD Phonebook is an employee directory which doesn’t update as it uses Active Directory for the employee/personnel data. AD Self Update complements the AD Phonebook as it allows employees with a quick and easy way to keep the company phonebook up to date. You can read more about the AD Phonebook at dovestones.com. Technical SupportThis document will walk you through AD Self Update deployment and setup. Should you have any questions please contact us. PrerequisitesThe program can be installed on any Windows Server that is capable of running .Net 4.5 which is currently Windows 2012 and above. 2012 R2 and above is recommended. The following software should be installed before installing the application:
You will also need a service account that has permissions to update Active Directory user objects, this account should have a strong password and ‘Password Never Expires’ checked. InstallationFollow these steps to install the application:
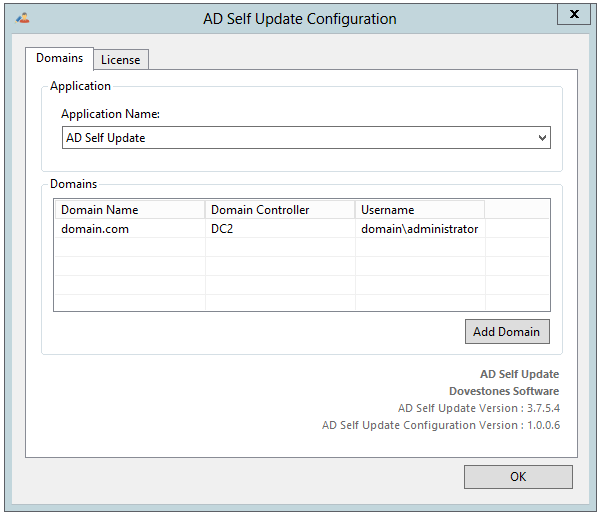
Adding a service accountPlease follow these steps to configure the Active Directory domain(s) that the application will use.
Accessing the AD Self Update web pageWhen you have added your service account using the Configuration program you can visit the AD Self Update web page, the address depends on the Virtual Directory name you chose during the installation, by default this is ADSelfUpdate. Your URL would be the web site address followed by the Virtual Directory name. Example URLS: Accessing the Admin pageThe Admin page allows you to customize AD Self Update, the Admin page can be accessed by adding /Admin to the URL. To access the admin page you will need to authenticate using a Domain Administrator account or a member of the Local Administrators group. Access to the admin page is controlled by a line in the web.config file; the line is below. You can append a group such as ITStaff to this list, you may need to restart the server or run IISReset as the command prompt for the new group to be recognized. By default access to the admin page is restricted to a select number of groups. You can add or remove groups by editing the line in the web.config file. Seperate each group name with a comma. Example URLS:
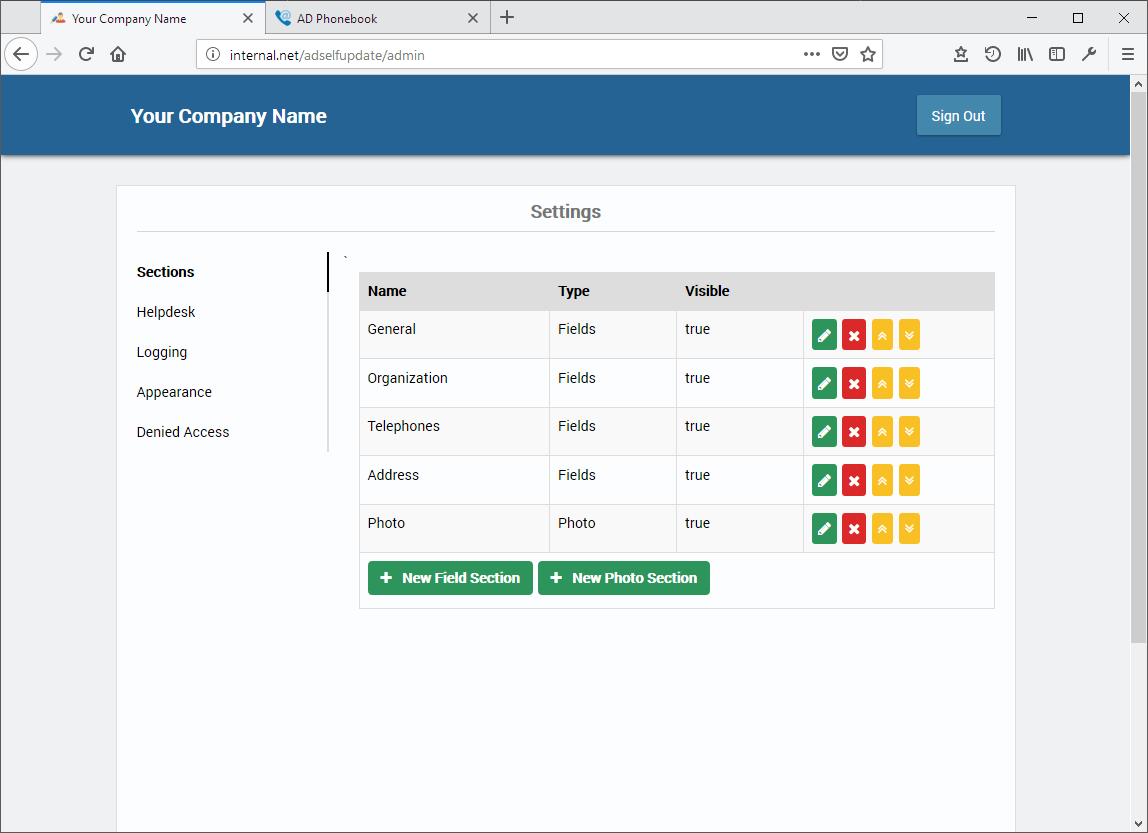
Configuring Sections – What users see and can changeBelow is a screen shot of the Admin page showing the Sections tab highlighted in bold.
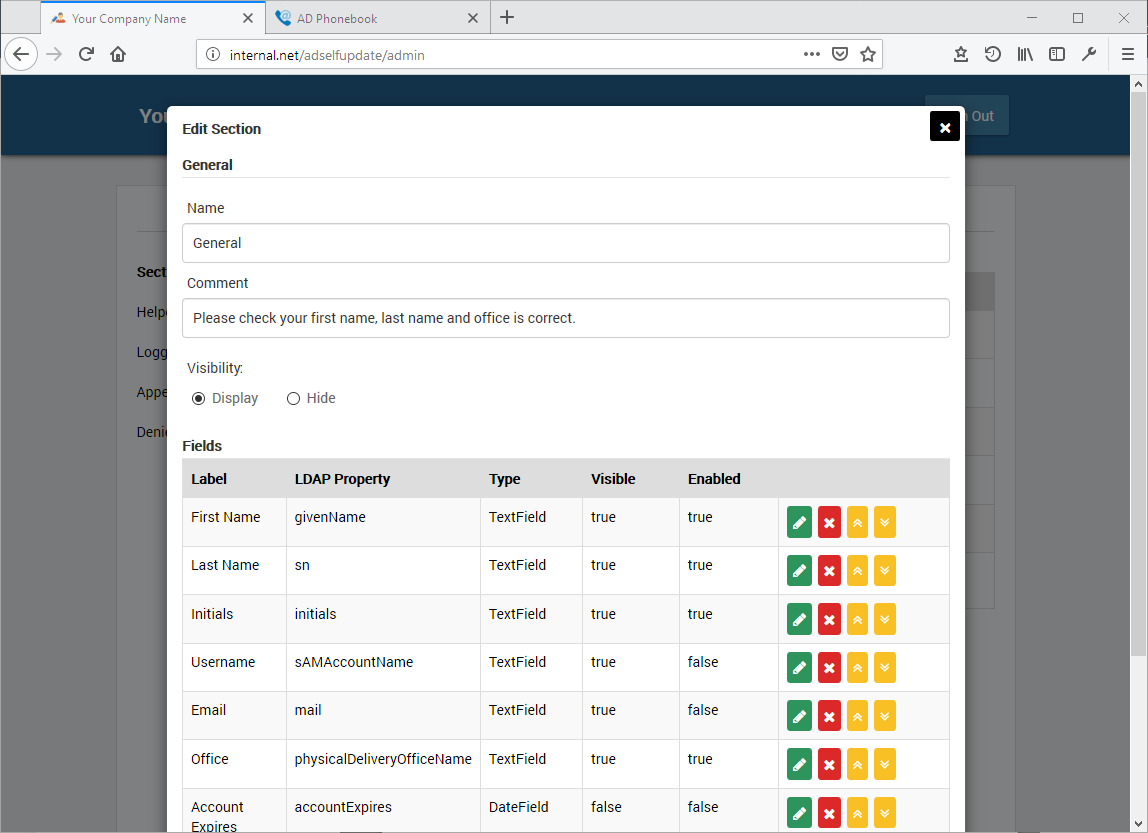
You can add, remove or rename the sections you see on the Sections tab. Sections are used to group common fields. To add a new Section click the ‘New Field Section’ button, to remove a section click the red X button, to rename a section click the green Edit button. To add, remove or edit a field click the Edit button of the section you want to edit, then you will see the fields the section contains. Below is a screen shot of the General section.
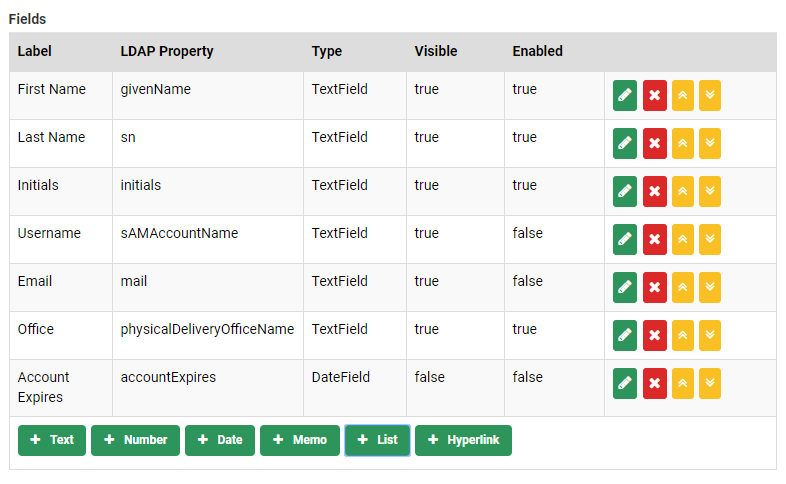
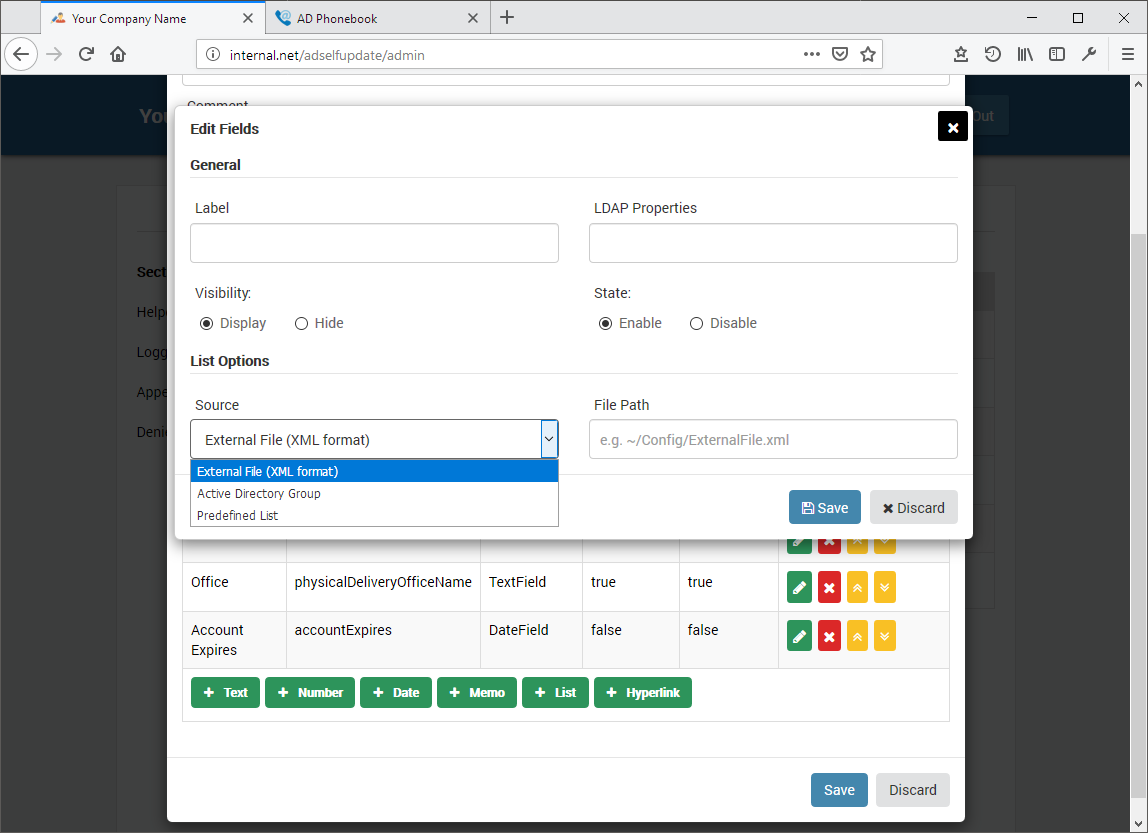
To add a new field, click one of the green buttons that matches your desired field type. For example, to add a new text field click the green button labelled ‘+ Text’, to add a new telephone number field click the green ‘+ Number’ button. To remove a field, click the red X button. Rather than remove the default fields you can disable them, this can save time should you need to use the field in future. Field TypesThe program supports the following field types:
Below is a screenshot showing the different selection of different field types which can be found underneath the fields table.
Common Field Properties
Number FieldThe number field can be used to display numeric values only and is commonly used for telephone numbers. The format and length of the number can be controlled by the Format text box. Enter a number 1 for each character and spaces to determine where you want them to appear. Symbols such as + can also be added to the format. For example, entering +1 111 1111 111 as the format would display as +1 788 2770 777 if the user simply entered 17782770777. This can be helpful in ensuring number saved to AD have the same uniformity. Date FieldThe date field can be used to update date type attributes, this is commonly used to allow Helpdesk (e.g. HR department) users to set the expiry date of an account. Memo FieldThe memo field displays a multiple line text box, this requires an AD attribute that supports multi-line values such as streetAddress or memo (Notes on the Telephone tab of a user in AD). List FieldThe list field can be used to access users data from an external file, active directory group or pre-defined list. Below is a screenshot showing the list field with the dropdown bar which can be used to determine the source of the field (user)?
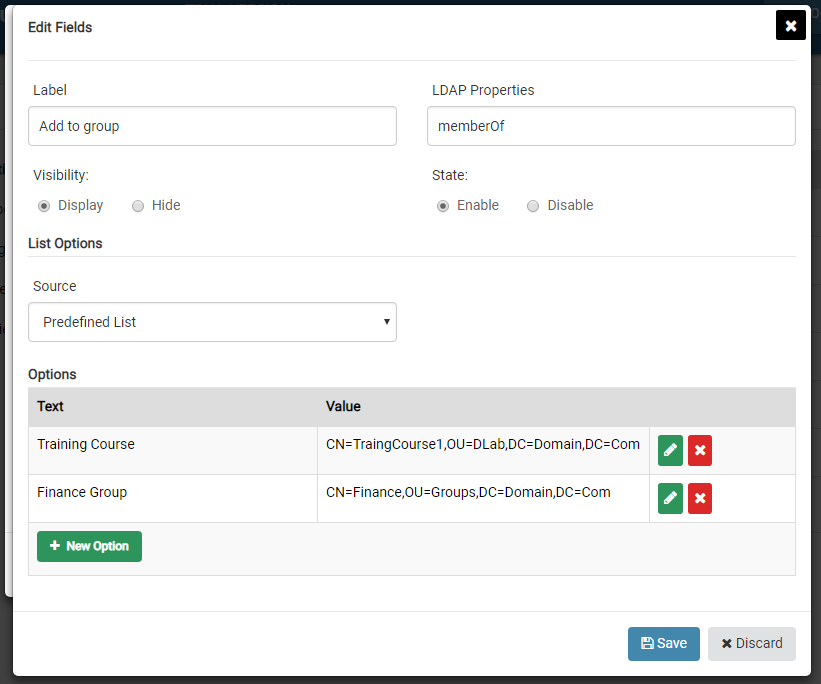
Using the ‘Predefined List’ option you can allow users to add themselves to groups. Below is an example configuration:
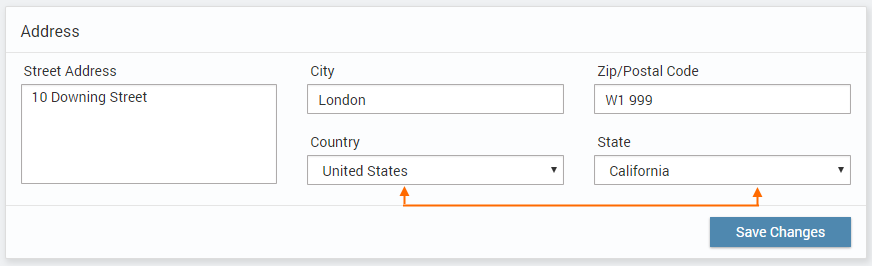
Dependent List FieldYou may want to make one field dependent on the value entered in another. You can do this using the Dependent Field option.
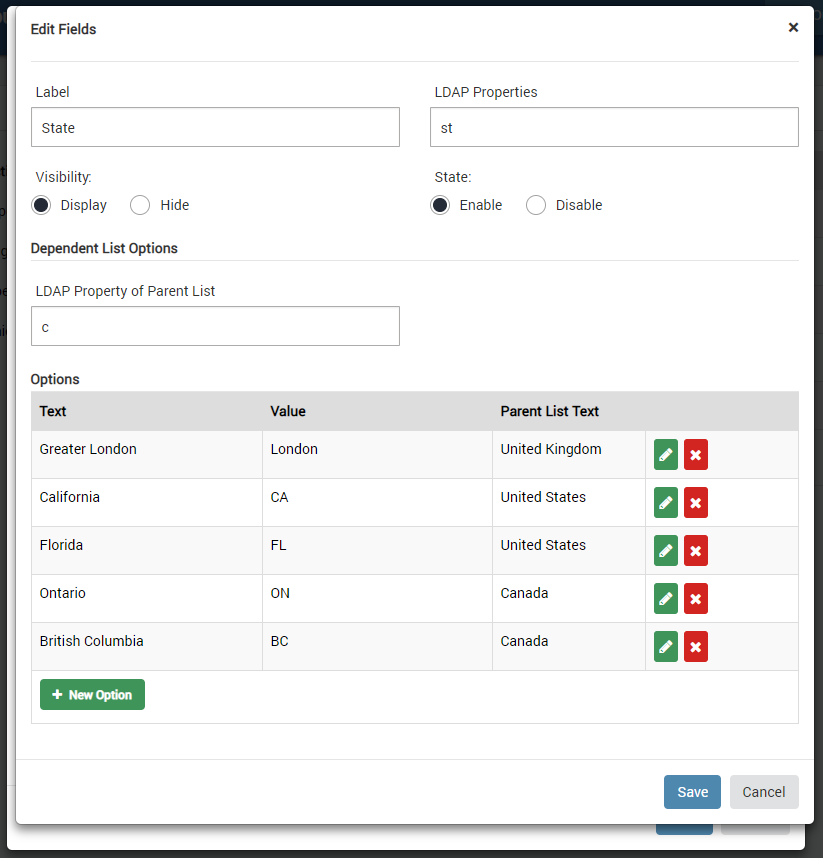
To add a Dependent List Field go to the admin page on the ‘Sections’ tab and click the ‘Edit’ button which relates to where you want the Dependent List field to be shown, in the example above this is the ‘Address’ section. Click on the Dependent List button.
Enter the name of the field in the Label box, in the example above this is State, enter the the LDAP property name where the value will be stored, for State this is ‘st’. Next enter the LDAP property name of the parent list. In the above example we are wanting the user to choose their state after selecting a Country so we enter ‘c’ the LDAP property for Country. Click ‘New Option’ to add a value that will appear in the drop down list. Text should contain the text the user will see, Value should contain the text that will be written back to Active Directory. The Parent List Text is the value the user will select in the Parent list. In the above example the user chose United States and therefore the Dependent List displayed the options California and Florida.
HyperlinkYou may want to add a hyperlink to the form, to do this simply click the ‘+ Hyperlink’ button. There is also an option to select if the hyperlink that you are adding is an E-mail address. Below is a screenshot which shows how you can add a hyperlink to the field.
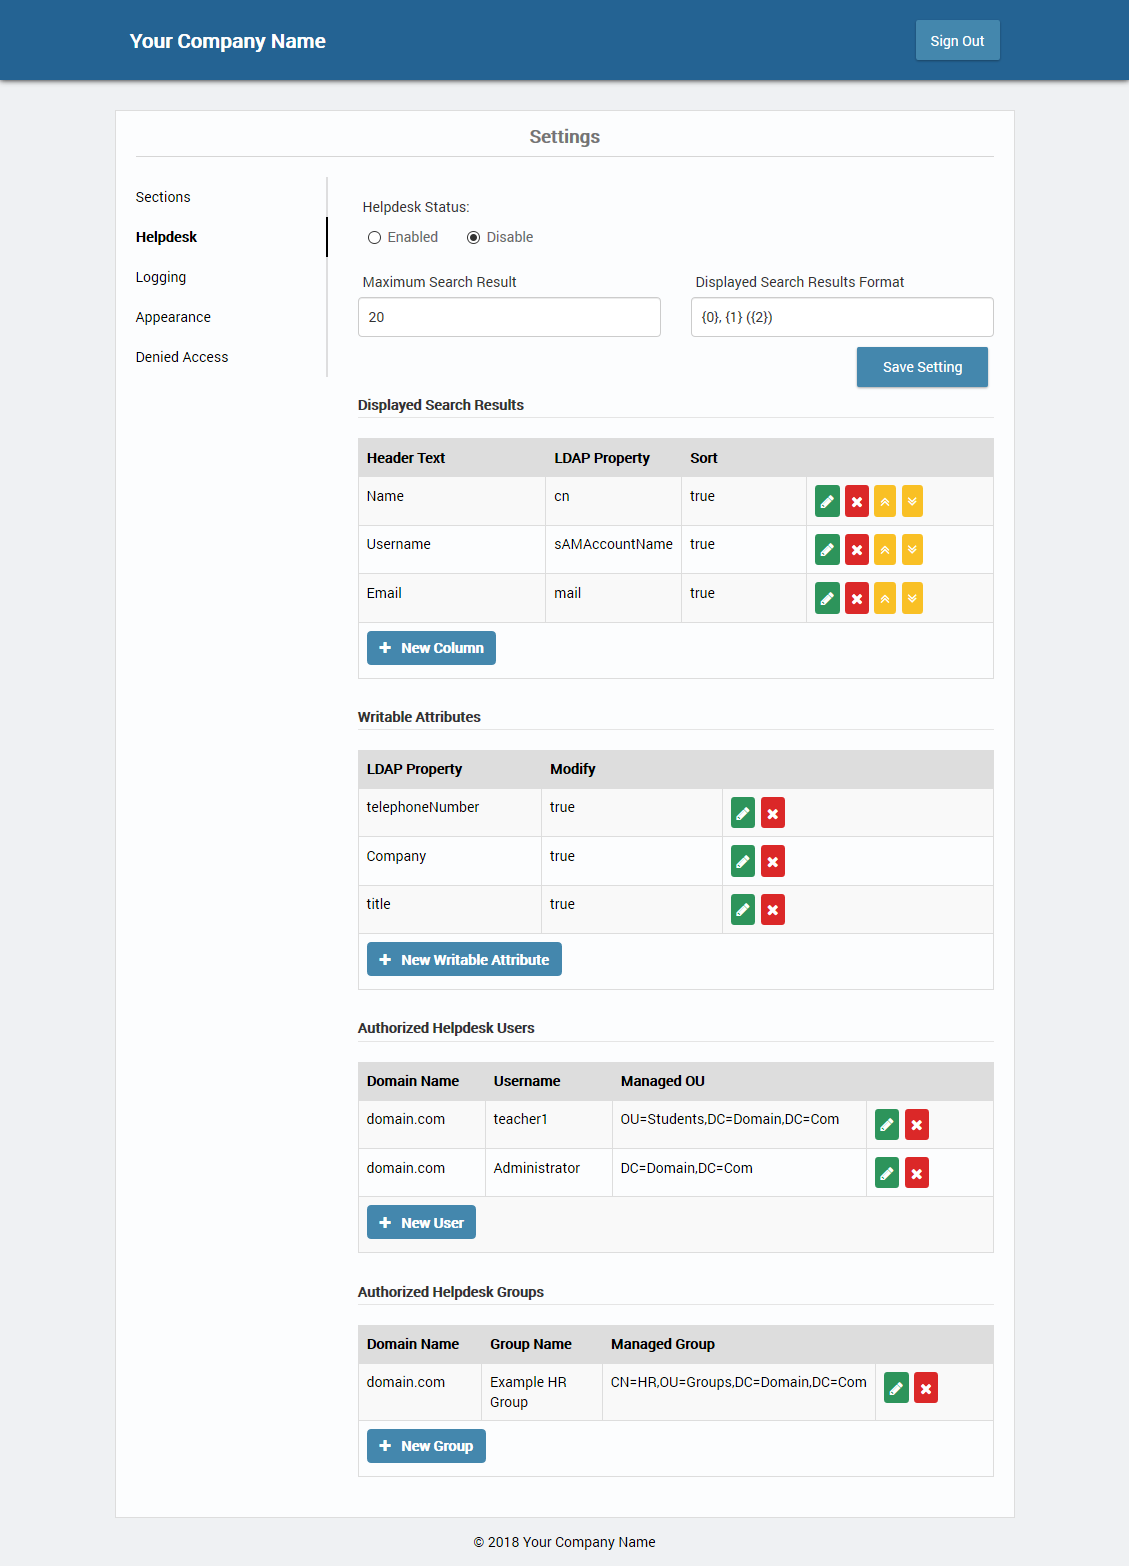
HelpdeskIn this section we’ll cover how to configure the Helpdesk feature. By default the Helpdesk feature is disabled. If you enable it your users will not see any difference unless you have specified them on this page as Authorized Helpdesk Users. You can have the Helpdesk option enabled and both regular and Helpdesk users can use the program at the same time. Helpdesk users will be able to update their own values, but should they search and select another user (that you have authorized them to update) they will only be able to update the attributes you have specified on this page as writeable. Below is a selection of screenshots that show the different functions of the Helpdesk under settings.
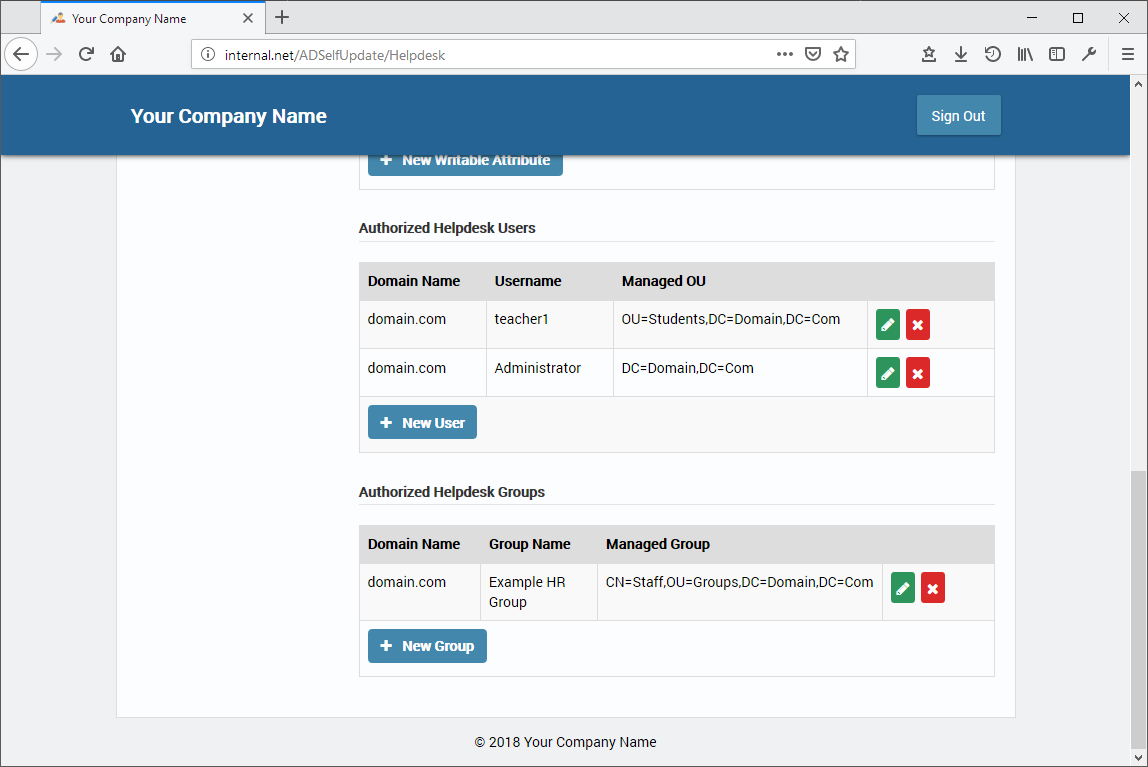
Under the sections Authorized Helpdesk Users and Authorized Helpdesk Groups you can add users that can update users that exist in the specified OU and/or groups whose members can update them members of the Managed Group. Below is a screenshot showing user teacher1 can update users in the Students OU and the administrator who can update all users in the domain. Members of the group HR can update the members of the Staff group. When these authorized users login they will see a search box at the top of the page, they can then search for users within the specified OU or Group and update the fields specified under Writable Attributes (mentioned above).
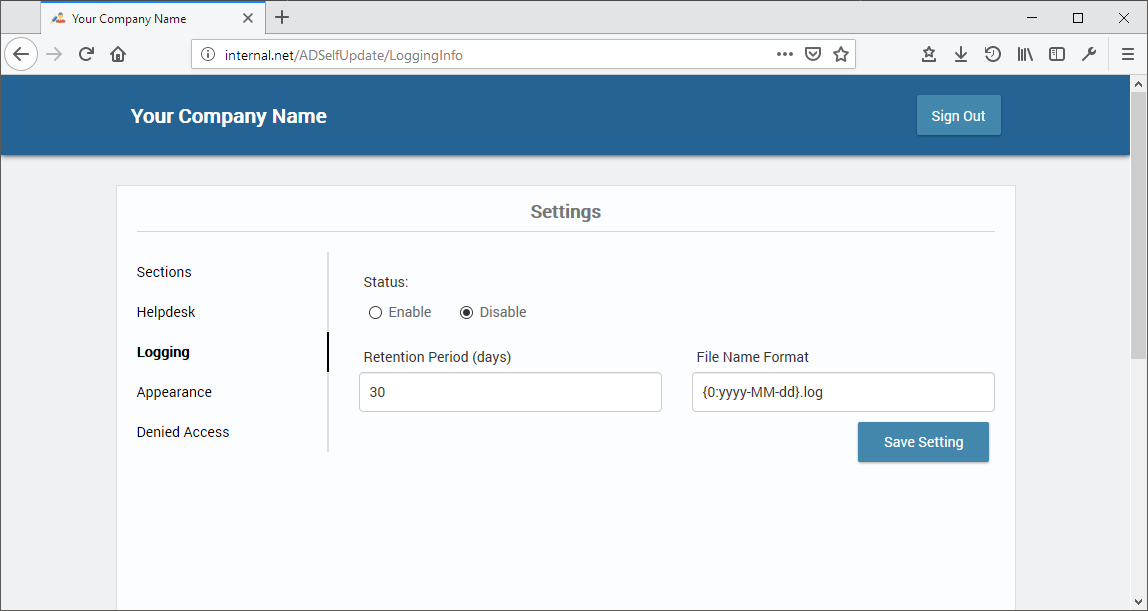
Log filesAD Self Update records all changes made by users to a log file. A log file is created for each day with the following format “yyyyMMdd.log”, by default log files are kept for 30 days. When a user updates his or other user’s information (assigned users can update others), the application will check if there is a log file for the current date, if the file does not exist one is created. The application will then write an entry to the file containing the following:
You can turn logging on and change the number of days logs files are kept via the Logging tab on the Admin page. * To allow the log files to be created and written to give the ‘Network Service’ account ‘Modify’ permission on the ‘Log’ directory (typically ‘C:\inetpub\wwwroot\ADSelfUpdate\logs\’).
CustomizationAdding and removing attributes from the home page The Sections tab on the Admin page allows you to add and remove sections (which contain fields such as Telephone Number) shown on the AD Self Update home page. The sections shown by default are listed below; you can add, remove and edit the fields contained within each section.
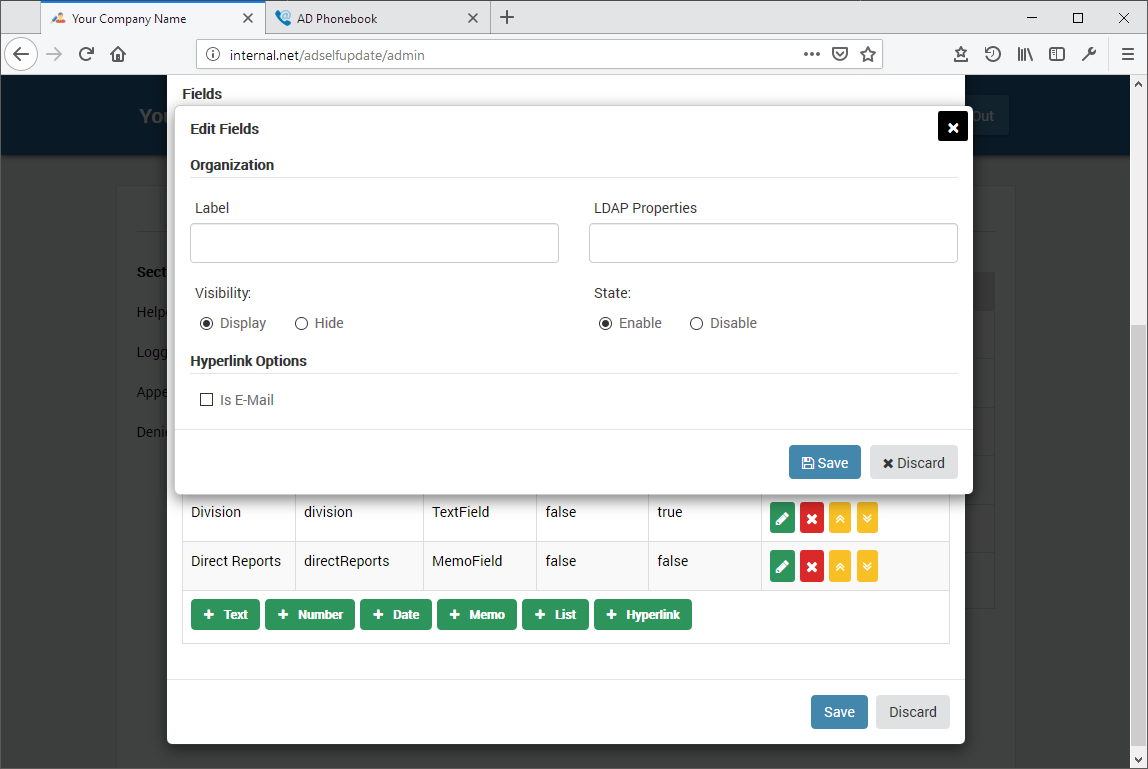
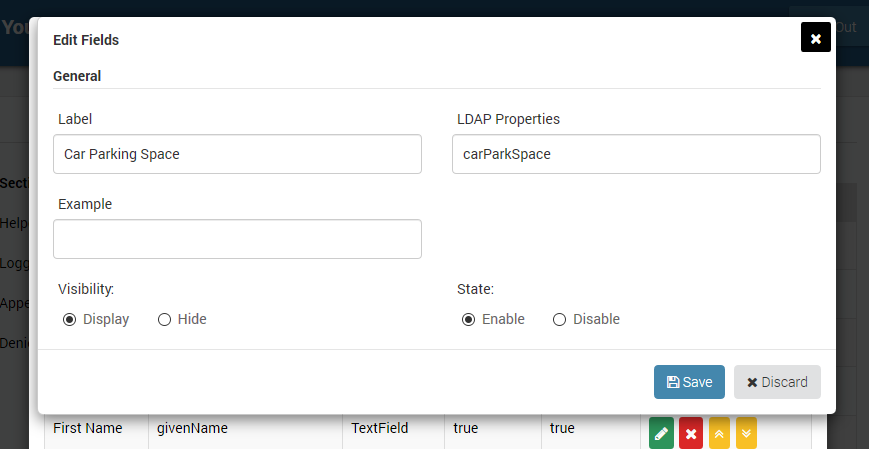
The image below shows the fields in the General section. You can add fields/attributes from Active Directory that aren’t currently listed by clicking a field type such as ‘Text’ (single line) or Memo (multi line).
The image below shows the ‘Text’ field dialogue box, when adding an unlisted Active Directory attribute enter the attribute name in the LDAP Property field. The Label field contains the text that is shown on the home page. You can use existing fields as examples.
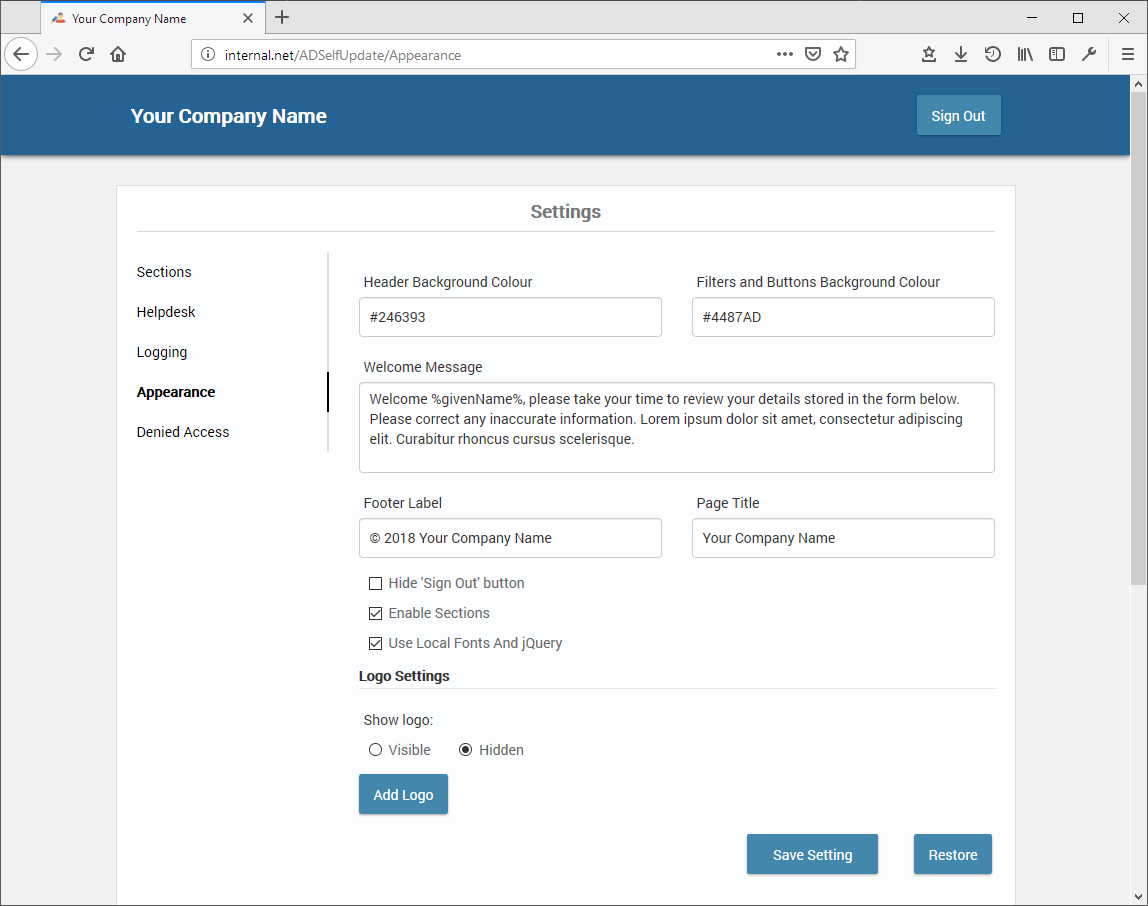
AppearanceChanging the Welcome Message, Page Title and FooterThe welcome message displayed to your users can be modified via the Appearance tab on the Admin page. You can also change the text of the Page Title and the text shown in the footer. The welcome message does support HTML so you can add links etc.
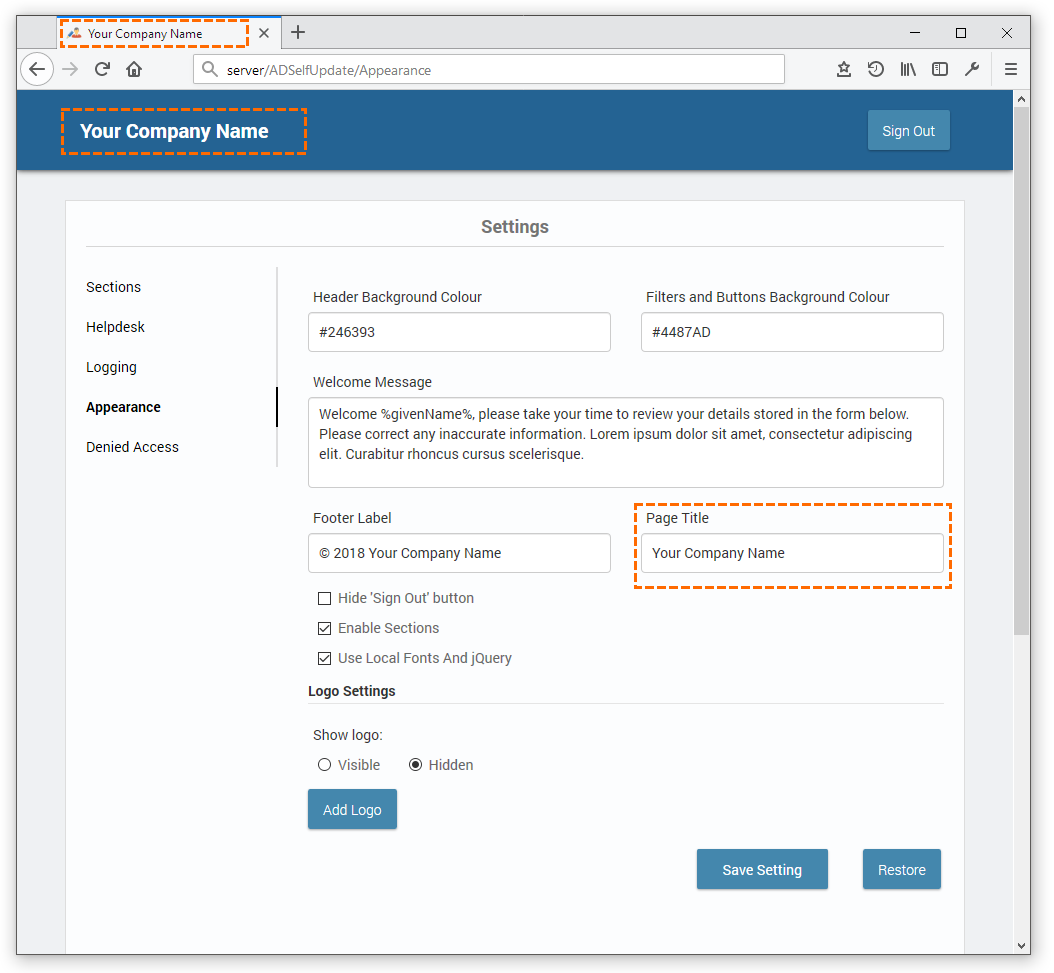
Changing the Page TitleThe Page Title is shown in the ‘tab’ of most browsers and in the header of the page.
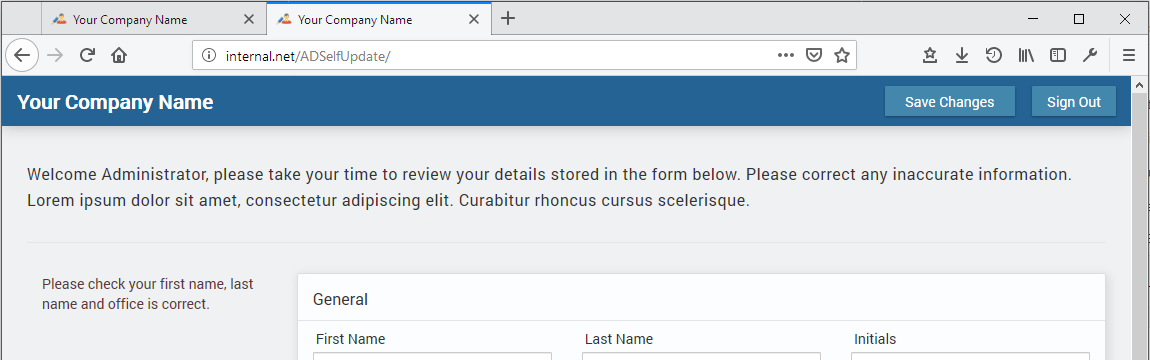
Below is an example tab showing the page title and welcome message.
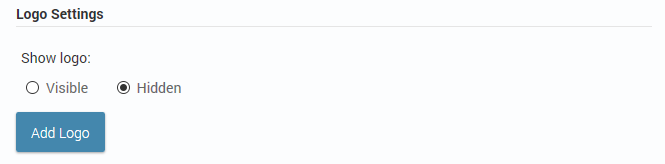
Adding your logoYou can add your own logo via the Appearance tab on the Admin page.
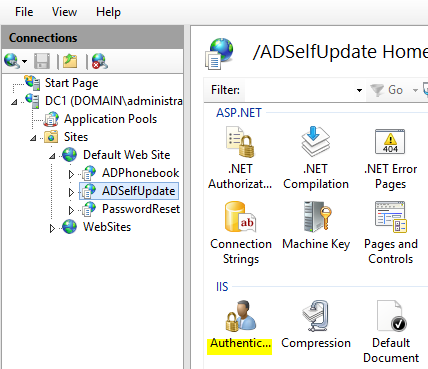
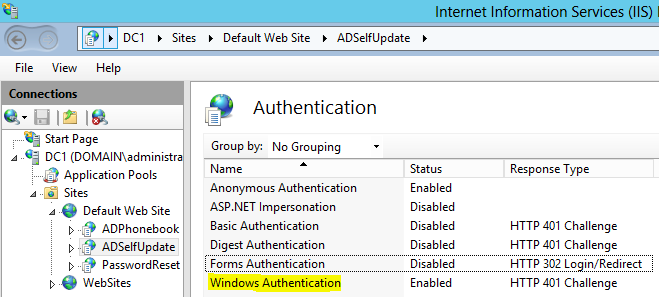
Using Windows AuthenticationTo use single sign on Windows Authentication, enable ‘Windows Authentication’ under the Authentication icon in IIS.
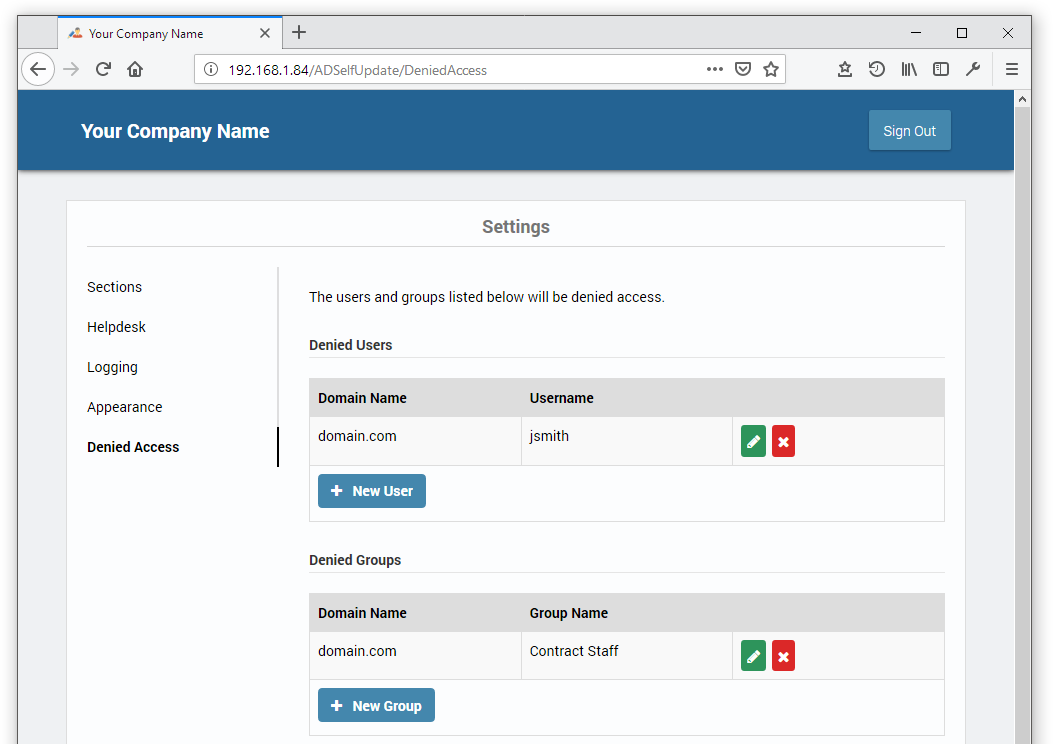
Using HTTPSWe strongly recommend you use SSL to encrypt the traffic when live but this is not required. You can test the program using HTTP if you are testing internally. Once live we do recommend you install a SSL certificate so the web site is accessible using HTTPS. The page below explains how to enable HTTPS in IIS. You can find other examples of how to enable https and add an SSL certificate can be found online. Denied AccessUsers listed on the denied access page will be unable to log in to the program. You can deny access to users or groups of users.
Help and SupportIf you require any help installing or configuring AD Self Update contact us. |
|---|
Footer
Dovestones Software
Copyright 2005 – 2023 © Infoopia Inc.
All rights reserved.
Registered office:
Infoopia Inc.
PO Box 93383
Newmarket Ontario
L3X 1A3
Canada
Phone (voice mail):
Toll-Free 1.877.335.8909
Outside of US/Canada +1.647.478.8078
Our Newsletter
Subscribe to our newsletter to receive the latest updates.
You can review our privacy policy here.